If it’s on the front cover of a magazine, or in a publicity shot, your outfit had better be good, right? Well, the villainess for Marvel’s “Agent Carter” television show wears some pretty killer post-War 1940s and early 50’s fashions, and no less so for the outfit she wears for both the preview publicity pictures of her character and for the cover of a vintage “Fashion News” magazine (seen in “Better Angels”, Season Two, episode 3).

In order to recreate her “Poster Girl” outfit, I made a bunch of different pieces – the dress, the hat, and the clip-on flower. I’m not complaining – this was closer to being a labor of love to sew, not a bother. It required a good flow of my creative juices, some good pattern sourcing, and taking my time to enjoy myself for things to turn out “just so” for an equally killer outfit which I would like to think could hold its own against the class of Whitney Frost. Her sense of fashion is probably one of the reasons she was held as the face for Hollywood, as well as her seemingly ‘perfect’ life with her husband. However,  being a “Poster Girl” (definition here) was a hard standard to hold up to for her. For Whitney, it only meant keeping up the façade of happiness and glamour, always smiling and keeping the truth hidden…and boy, did she have some dark secrets to hide. George C. Scott once said, “Technique is making what is absolutely false appear to be totally true in a manner that is not recognizable.” Here, I intend to only stick to Whitney’s fashion without her superficiality. This is my closest copy yet of a Ms. Frost outfit, and I absolutely love it!
THE FACTS:
FABRIC: THE DRESS and FLOWER: a 100% cotton sateen, a “Gertie” print; THE HAT:  a buff satin polyester solid in fuchsia color
PATTERN: THE DRESS: Simplicity #8390, year 1951, “Misses One-Piece Dress and Stole”; THE HAT: Vogue #7657, view F, year 2002; THE FLOWER: the instructions and guide to how to make a ‘Dior’ rose came from a small “Easy-to-Sew Flowers” booklet, compiled by Threads magazine, copyright 2012. The tutorial is listed as adapted from Threads article “Dior Roses” by the late Roberta Carr, in issue no. 34.
 NOTIONS: Believe it or not, this outfit was made with only what was already on hand. I had all the thread, interfacing, closure notions, bias tapes, and other odd and ends needed for the hat, dress, and flower here in my “magic” stash. The only thing I needed was to order a buckram hat blank base (more info where it came from and what it is exactly down later). Ah – and the cotton velvet ribbon, “Waverly” brand, was bought (of all places) at Wal-Mart.
TIME TO COMPLETE: The Dress was made in about 20 hours and finished on September 15, 2016, and the hat came maybe 10 hours later. The flower was made in just under an hour the day or two afterwards.
THE INSIDES: There is a combo of both French and bias bound seams inside this dress for a clean finish.
TOTAL COST: The dress cost a reasonable but decent amount, about $7 a yard for about 4 yards. The hat fabric combined with the buckram base and ribbon cost me just under $15.

I had some problems dating my dress’ pattern. My first problem was the presence of new pattern numbers stamped in grey on the back info of the envelope. The instruction sheet has the date of the year 1951, but the newer stamped numbers of ‘4291’ would make this about year 1953. However, as everything else to this pattern points to the year 1951 (the style of dress, the original numbers, the instruction sheet, as well as the double bars on the top left side of the front envelope), I am sticking to that early year in the decade. I have not yet found any evidence of this design being re-released later under a new number, so I’m not sure why the stamped combination was added on (it does look quite official like it was a die cast impression). One of the many wonders and curiosities that vintage patterns offer…

The dress design is lovely, and smartly designed. It also fits very well on me – perhaps the best fitting 50’s pattern to date. I usually find that the back waists are too long, shoulders proportionally too wide, and busts too generous on other 50s patterns, but not here! The pattern was close enough to the inspiration dress that some small adaptations were needed to get to where I wanted it to be for my copy. The fabric is, as you might have seen above in “The Facts”, another lovely Gertie print. My other Whitney Frost dress that I made was in a different Gertie print, so this is the second time her fabric has been what I feel is the right parallel for channeling the Agent Carter villainess. Sure my dress fabric has more grey with an addition of magenta and deep purple, but these last two mentioned are her signature colors, and the print is still a water colored in theme like the original, so I feel it is a good match. From what I can tell, I suspect that the original dress on Whitney Frost is silk, and maybe a taffeta form of that, but Gertie’s sateen prints are quite luxurious without being impractical for a not-overly-dressy garment. This means my dress will see more wearing…and as comfy and classy as I feel in this, frequent donning of it is good!
 The collar is of course the highlight of the dress and although the original design is neat, with a little mind crunching to figure out the curious construction method I was able to tweak it to have it more like Whitney Frost’s inspiration dress. I re-drafted the over the shoulder portion to eliminate the notches, then curved and widened it a tad more. I also had the facing be the same as the dress fabric, not a contrast as the cover envelope shows. The underside of the collar has this interesting L-shaped method of piecing together the collar while the outside facing is all one, long, giant wrap around-to-the-back cut – I love vintage pattern details!
Maybe the collar is vying for the top favorite position among this dress’ feature because I also love the squared off armholes and the squared back of the collar. This shows how subtle complimenting of details can go a long way and make all the difference for an awesome garment. The square back of the collar end is something I haven’t seen in a pattern before and it is a nice way to add interest to the view from behind. The squared armholes allow for extra room that my larger upper arms appreciate, as well as something extra different and lovely.

The skirt had been a small, sort of adapted half-circle, bias-cut four-panel style. What I did for my dress was to take the side seam side (over the hips) and add about 5 more inches out so I could gather the skirt over the hips. This created and extra 10 inches over each hip which was then tightly gathered between side front to side back. The gathers give my dress an extra 50’s style widening emphasis on the hips, slimming my waist (so I feel) and also (I think) balancing out the giant collar better than the original plain skirt as the pattern shows. (This vintage year 1949 dress has the same skirt with gathered hips.) Besides, I wanted to copy the same detail on the inspiration dress of Whitney Frost.
 However, adding the gathers over the hips of the skirt portion to my dress did mean that I could not place a zipper in the side. Where would I put the zipper? Bing – on goes the light bulb over my head. Down the front like a pants fly! This idea actually came from seeing this kind of closure method on and existing vintage 1950’s dress I have – this is how I knew to re-create it plus the benefit of knowing this was done in the decade (keeping things authentic). The front bodice of the dress is a wrap-over, double-breasted closure so I merely continued the closure down the front center seam of the skirt to include a small 7 inch zipper. It took some forethought, but I love this part of the dress! It’s so easy to get in and out of with all the closures in plain sight…not on the side or down the back like many other vintage garments. I think the front zipper is pretty undetectable. Knowing that I made something work out, besides its being different and new (for me), leaves me tickled.
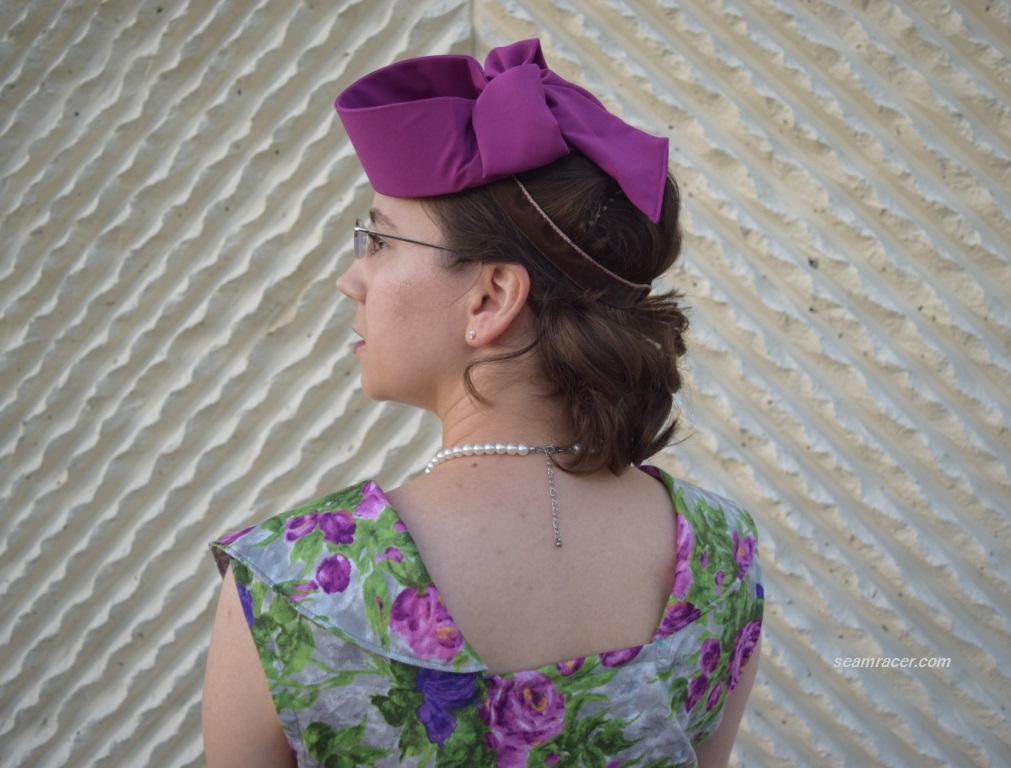
Now – onto the hat. I must say that the hat itself is ingeniously designed and the pattern was excellent, very clearly explained and turning out a finished product better than even what the picture shows (so I think). It is incredibly simple in its construction and design, but it is also terribly tedious and detailed work to make so that it turns out well. The last part is where the ‘trouble’ comes in, especially for me because I cannot tolerate hand sewing (because my wrist and shoulders do not take it well). However, every ache and minute spent on this hat was so worth it to me ending up with something like this! I feel like this hat is my first fully ‘proper’ millinery piece, and it was good practice with good teaching steps towards diving into more detailed and professional headwear.
I was able to use everything that was on hand already, but the buckram hat base was something special needed here – no ways around it. The good news is that I found the buckram hat blank quite affordable and very easy to work with…I was even able to stitch around the edge on my machine! For this hat I used a 7 ½ inch by 5 ½ inch teardrop shaped blank from “Dance Costume Supply” on Etsy. It did have a covered edge with a wire in it (not called for in the pattern’s instructions), but I think it gives the hat better, firmer shaping than otherwise.

My first step was to cover the buckram blank. The instructions say to steam the fabric or soak in water in order to shape over the hat blank (blocking method), but my chosen fabric is a poly blend and would not react to either method so I cut the piece on the bias and lightly stretched (then stitched) the cover pieces over both underside and top side. Next, the head straps were made and stitched onto the side edges. Then I made a bias binding and stitched it over the edge just the same as one would for the neckline or armhole edges of a garment – easy!
I am so glad I went with my gut and made the head straps to match my hair color rather than the hat. I love how this helps the hat stand out all the better and the way it stays on all the more subdued. I especially love the fact that I used good old-fashioned cotton velvet ribbon, too. Not only does it add a bit more authenticity (being in cotton), but from a practical standpoint the velvet literally acts like Velcro to my hair keeping the hat band in place like glue where I put it without needing pins. Cotton velvet ribbon hair bands for hats are literally the best thing ever! I need stock in this ribbon for my next hats…
 The final step to the finished hat was the hardest – the stand-up crown. This is really nothing more than an interfaced rectangular strip of fabric whose edge gets sewn right onto the very edge of the front 2/3 of the hat. This was very slow, tricky work that did damage to my hands and required precision to make the stitches invisible. Beforehand, however, I scavenged through the house to find something more poker-stiff than the
  interfacing sewn in the crown and – bingo – I came across a perfect sized strip of thick plastic laminate to slide in the rectangular piece. Every so often my habit of saving “things-that-might-be-useful” comes in handy, as long as I can find what I want when I want it. Anyway, this plastic worked perfectly – it’s still 100% bendable but keeps a shape nonetheless. I cut the strip a few inches shorter than the fabric’s length on each end so I could fold the crown down and tack onto the hat base, behind which the bow sits. In order to give the bow some pouf without stiffness, the final extra adjustment was to have a strip of sheer organza in the fabric bands. In order to cover up the not-so-perfect bow center, I have a small bias band to finish things off nicely.
Last but not least is the fabric flower clip. This flower was so fun and easy to make (one hour!) I am tempted to spend one day to make a dozen of these out of my fabric scrap stash. They do not need that much fabric – just three pointy almond-shaped ovals in consecutively smaller sizes cut on the bias. My flower turned out very good without much difficulty and too much hand stitching (I was about done with hand stitching after the hat). Some scraps of green felt finished off the bottom of my flower and gave me a lovely ‘leaf’ look as well as a base to sew on my hair clip. I’d bought this how-to booklet at our local JoAnn’s fabric store a few years back, but finally just came to using it – I should have done so sooner! If you’d like to try these Dior roses out for yourself and don’t know where to find the Threads booklet, visit the blog “Oliver + s” for an excellent tutorial along with a mini history lesson (link here).
 This flower just so ultimately finishes off my outfit, in my opinion. It’s that understated extra touch, not to mention the fact that it is a fabric rose in the style of the famous Dior. This is so like Whitney Frost to wear an accent used by the “famous Parisian couturier whose designs were worn by the world’s most glamorous women” (to quote the Threads article). It all adds to the sham of the “Poster girl’s” face. For me, it makes my handmade efforts seem all the more worthwhile to be able to use my talents to re-create something from the likes of Dior, Hollywood, and the decades that had more style and class than what I see in most fashion of today.
Speaking of style and class, a small part of this outfit is (I would like to think) also in the mode of the most sophisticated woman I’ve known – my own dear, and now departed Grandmother. She was a young, newly married 21 year old in 1951 (the year of my outfit) and she frequently dressed up, and on these occasions would never go out lacking a hat, pearls, and a flower (she loved nature). Grandma was also a “Poster Girl”, too – in her younger years she was a local vaudeville celebrity. Oddly enough, I recently found a picture of her in a dress similar to the one in this post, with a large collar and double breasted front closing, from the year 1951. I know her dress is in a solid with a notched collar, different from my own, but we do share the same smile and taste in clothes, so I would like to think she would be proud to see me wear something after her own heart. This is why I’m including this dress in Tanya’s “Dress Like Your Grandma” sewing challenge. Have you heard about this! Maybe you could join in on the challenge along with me?!


Beautiful dress!
I am always amazing by how much detail and thought is behind your creations and your posts. It makes for a very interesting read.
I think my favorite part is the hat. It is absolutely beautiful. I didn’t even notice the velvet band until you pointed it out!
Also lovely photo of your grandmother! Sometimes I wonder if people were simply better looking back in the 50s and 60s… I remember finding a yearbook from the mid 50s at the thrift store and all of the girls were so beautiful and the boys were so handsome!
LikeLiked by 1 person
Sorry I missed this lovely comment ’til now!
I agree with you about how people looked in the past. So many people in my Grandma’s pictures looked as nice and classy as a movie star (including her at times). Even those that didn’t look like movie stars are charming and intriguing…something that makes one want to stop and study those old photos.
The hat is my favorite part, too. I still can’t believe I made it…it’s one of those things where I just was working on it and it wasn’t ’til it was done I’d realized how it turned out.
I’m glad you enjoy reading about the ideas, thoughts, and stories which go into making what I do. I does me good to write it out and share it!
LikeLike
Pingback: Dress Like Your Grandma FINAL PROJECTS