If garments could be reasonably conscious, this dress would definitely be very confused. My original plan was to make a knock off a Dolce & Gabbana outfit from fall of 2016, but the pattern which I used for the dress is from 2013. The knit tulip fabric I used is vintage from the 1970. My husband says the finished dress reminds him of the 1980’s, and here I thought it reminded me of the 1930’s! Finally my purse was self-drafted off of an existing 1940’s leather purse from my wardrobe but has more of a 1950’s air now that it’s completed. Gosh – almost every decade from the past 80 years has some sort of influence (in our eyes) to this outfit. Confused much?! Is your brain alright? I know my head is swimming.

Linda of “Nice dress! Thanks, I made it!!” hosted the “Designing December” months back now and personal illness combined with a busy holiday season made for my being unable to even get around to making this dress and purse until recently. Besides, everything that had to come together for me to even work on this project was slow and time consuming, but don’t get me wrong totally worth every minute. Thus, my outfit is being blogged late but perfect for those chilly spring season days that hang around right about now. It might be spring, but it feels like winter some days in our climate…and this subtle but cheery, long sleeve black dress with a season-less hound’s-tooth fashion purse suits those times perfectly. I know because it was quite brisk and windy the day we took these photos, and I am sensitive to the chill. Sigh…a warm enough spring is so long in coming sometimes. That’s why I need to wear some bright tulips!
THE FACTS:
FABRIC: for the dress: The tulip fabric is a polyester interlock knit vintage from the 1970s ordered through an Etsy shop, the skirt flounce is a modern, newly bought solid black poly interlock while the lining fabric is the same except in white. The neckline facing is a cotton broadcloth remnant. For the purse: novelty hound’s-tooth felt and polyester imitation snakeskin (leftover from this dress) for the outside, light blue lining on the inside with a big pocket made from a scrap of cotton leftover from this apron.
PATTERN: Burda Style’s Gather and Tuck Dress, #112, from September 2013; no pattern for the purse, it was self-drafted
NOTIONS: This dress and purse used up a lot of what was sitting around on hand – such as charms, buttons from my Grandma, elastic, interfacing, and thread.
TIME TO COMPLETE: I have no idea how much time I spent to prep the tulip fabric, but the making of the dress took about 8 to 10 hours. The purse was started and finished in 4 hours. Both were done and ready to be worn on March 13, 2017.
TOTAL COST: The vintage tulip knit was about $10, the modern interlock knit (in both black and white) for the bottom flounce and the lining were just under $20, and the cost for all the fabric pen packages was $15. Everything for the purse was already on hand (bought years back) so I’m counting that and all the notions used from out of my stash as free. I suppose this outfit is a total of $45. This is more than I typically spend for many other outfits I like much better than this one, but I had a creative itch I needed to scratch!
As for any Burda Style pattern, printing and/or tracing is necessary to have a usable pattern to lay on your desired fabric. My pattern was traced off of the downloaded and assembled PDF bought at the online store but if you have a magazine issue, use a roll of medical paper to trace your pieces from the insert sheet. It’s at this preliminary step that you pick out your proper size and add in your choice of seam allowance width. A scissor with a magnetic ruler guide helps immensely to quicken along the step to getting a finished pattern prepped. Sorry to repeat something you might already know, but this is just an “FYI” for those that don’t know.

First off, I will say that my first impression of the dress at the pattern stage was one of strong dislike. The comments on the bottom of the pattern’s page online express “terrible look” and “reminds me of Downton Abbey”, and yes, I agree. However, the line drawing is what kept pulling me in…the style lines are lovely and indeed vintage inspired. This is why my dress is included in my ongoing “Retro Forward Burda Style” blog series. As to the vintage inspiration, I listed most of it at the top of this post. My favorite vintage pattern that I think looks quite similar is a Pictorial Review Pattern from the 1930’s, no 6459 (picture on Pinterest). It is labelled as a “Duchess de Crussol (d’Uzes)” personal pattern design, and as that is one of the oldest premier dukedom in France, this design must have been a big and rare deal for Pictorial Review to offer. After all, Dolce & Gabbana’s summary of their collection references “the ’30/’40s shoulder line of the Cinderella-referenced puffed sleeves.” Modernly, though, I feel like the “Gather and Tuck” dress is a slightly poufier version of another one of their patterns – Burda #7127. Perhaps I should have chosen this dress design instead…oh well, too late for this thinking.
I had the feeling the “Gather and Tuck” dress design needed something bold and not in the least cutesy or else I could not pull off wearing/liking it. Enter one of my favorite fashion houses – Dolce & Gabbana to the rescue courtesy of their Fall 2016 ready-to-wear  runway releases. I love all the details of that whole entire line (especially this one), an occurrence unique to me, but the tulip dress especially struck me…it was just something I had to have for my own and it would be something unique for my wardrobe. Luckily, it strongly reminded me of Burda’s “Gather and Tuck” dress. Now I had a tip as to what fabric print might work for such a quaintly designed pattern! Then came along Linda’s “Designing December” sewing challenge and I knew what I had to make for it. Finally, because I love to go all out for an awesome outfit, I even imitated the purse. The model’s handbag reminded me of a project I had been wanting to make for the last 3 years, with the hound’s-tooth fabric and everything I needed to make a purse luckily (and conveniently) waiting downstairs to be whipped together. Granted I know my outfit is not an exact copy, but to make a carbon copy would have resulted in something I might not have liked as much as this version which still stays true to my own taste. I do not know if I fully succeeded in achieving what I’d hoped and envisioned originally in my head for this outfit, but I feel like it’s a successful attempt. If I can’t buy designer, I’ll have my own designed style!
What is the most special and time-consuming part to making this project is the fabric. It is hand colored! That’s right – why just leave the current coloring craze to be restricted to paper pages in books?! This was a complicated yet invested choice – a desire to have something incredibly personal, creative, and out-of-the-box, as well as out of necessity. I could not remotely find any tulip print I liked to also have a lovely drape except for a 2 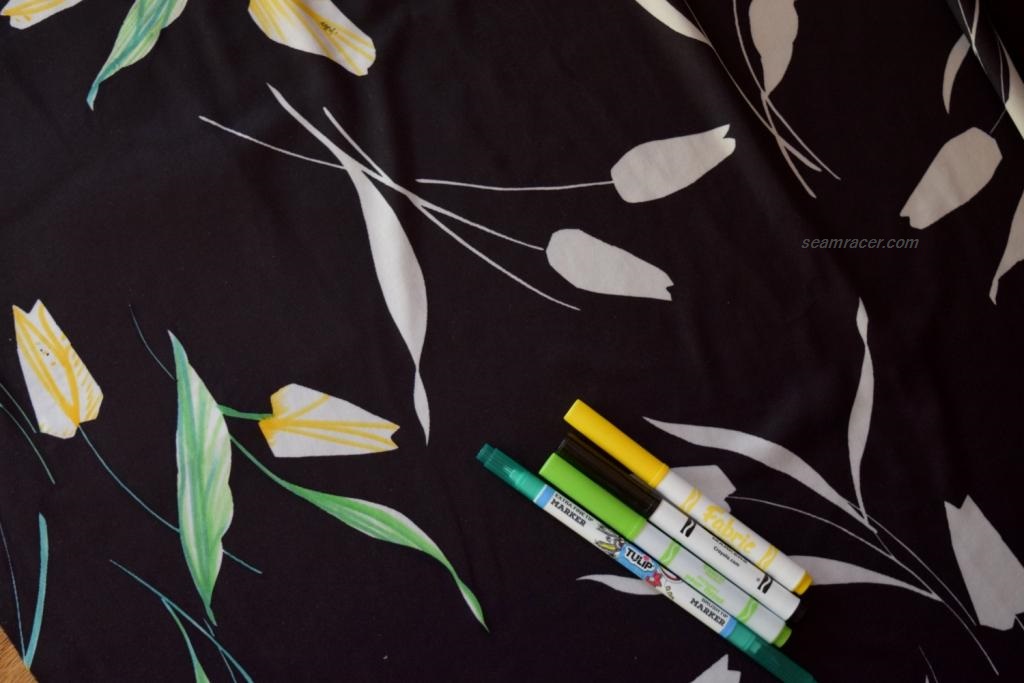 yard remnant piece of old 1970’s era knit in a black and white tone. So I used fabric pens to color in the yellow tulips and draw in two-tone green leaves to end up with the closest possible match to the original Dolce & Gabbana fabric. I worked in spurts, setting aside about an hour or two at a time to fill in a portion of the fabric until it was done. Yet, I didn’t just color – a tried to add texture when drawing the leaves and a hint of yellow to the flowers, not an overpowering brightness, with a random tough of black for the stamens. Too bad the true-to-life colors do not translate well enough through the pictures as they are in real sight.
Using fabric pens was fun, but also sort of a nightmare. I actually had to end up buying 5 packages (two different brands) just to finish. The fabric pens were brush tipped and between the material soaking up the ink and also fuzzing up the tip of the pens, there was a disappointingly short life to them. The tough part was the specific green colors I was using. The dark forest green and the lime green were hard to find in the heat-set type of fabric pens I preferred to use. I found some online but the seller on Ebay that I ordered from was dishonest and sent me something I did not order. Desperate, I ended up finding what I needed to finish from Wal-Mart, which had these cheap $3 packs which worked well enough. From this experience, I can say that three things – I think Crayola fabric pens are the best working brand of fabric pens, I definitely prefer heat-set fabric pens, and make sure to have several back-ups of your colors before doing a project. This is advice from a lesson well learned.

Now, to get to some info on the actual sewing of the dress! I found the sleeves to be rather skinny, the top half of the skirt to run small, and the rest of the dress a tad on the generous side. It sewed up pretty well, but some of the directions were just plain bad and ended up a little silly and bulky. The “slash-and-gather” darts at the waist and the mid-shoulder line are by far my favorite feature but kind of turned out a little weird looking where they end to meld into the dress. Two of my 1940’s projects (see here and here) have very similar “slash-and-gather” dart details at the shoulder line, although this Burda pattern has them on the back as well…very nice! The pattern originally called for only one button at the top of the closure, but I felt the pull from the gathers made me feel that the neckline needed another. The bottom third button is decoration only. I did leave out the wrist button closing on the sleeves, as my fabric is a stretchable knit. Other than the button closures, I made no real changes to the design. When you see the V-neckline in some of my pictures that is not a permanent thing. See – it’s merely me folding half of the high neckline inside for an easy and quick change to the look of the dress.
Perhaps you didn’t notice, but there are no closures needed to be dressed in this frock. The waistband gathers are mostly from an elastic casing made out of the waist seam allowance, and besides the neckline buttons, that is everything it takes to put this dress on. I’m so used to zippers in a dress that it kind of felt as if I was forgetting something. This one feature offering both easy dressing and lack of zipper setting was a nice change for me to come across.

So…after everything I’ve said, I am not all that crazy about my dress. Pooh pooh! It is comfy, easy to move in, feminine, and flowing. Wearing a sweater with it makes the dress better in my opinion, but then you can’t see all the details…meh. I just am not 100% decided that I love it or even look good in it. “Is it only weird or obviously dated?” I wonder. That lack of full confidence is what’s holding me back, but the amount of time and work invested in this project makes me think, “I’d better darn well wear this and be proud of what I made…” I have to throw some of my indecision to the wind (literally as it was breezy the day of these pictures) and just be content.

To be definite about one thing, I am absolutely tickled about the purse. I really could not be happier with it and it should see much use being so roomy, practical, and stylish all at the same time. I am resigned to not having an awesome buckle (like the original Dolce & Gabbana one) because my purse has a perfectly matched novelty hound’s-tooth printed zipper instead! This was combined with the opportunity to use some snazzy “Hilary Duff” brand charms from out of my jewelry stash to ‘bling’ up the closing flap. I do love Fleur-dis-lis anything!
 That hound’s-tooth print of the purse is felt, but is was first strengthened with iron on interfacing then re-enforced, as was the rest of the purse, with stiff sewing interfacing. This way it keeps its shape well. The edges were covered and stitched with self-fabric binding but every other seam is self-enclosed by the combo of lining/flap facing. There are buckles coming out of the side panel pleats, so I can totally change out purse straps into something else if I so please. The zipper was hand-sewn in last, not to necessarily make things hard for myself, but because there was no seam to connect to on one side and I wanted invisible stitching. All in all, my one regret is that I did not make a pattern out of what I was doing so I can re-create it or even share it, too. I just wanted to enjoy making it and get it done so I could use it! What a one track mind I have at times…
 For the record, I did go the extra mile to make a removable collar out of the black imitation snakeskin that went on my purse. The original Dolce & Gabbana dress has a black swede collar on it and I intended to imitate that but hated it on me on the dress. I’m so glad I didn’t sew the collar into the dress! I used a Simplicity #1727, a pattern of nothing but various removable collars. My make from it turned out great and I will show it to you, just not with this post. I seriously don’t know how the model pulls off the whole outfit so well with the collar, though! I will try to match my collar with something yet and show you then.
Investing so much effort in this outfit might not have given me the best results, but I learned from it, did new things, and followed an idea. Taking the safe and sure route for a sewing project doesn’t always do all of those things, right?! It’s all part of what sewing and creating is about, anyways. “Fashion makes people dream—this is the service fashion gives,” Stefano Gabbana has said. I agree.

Ah well, I’m not an expert to recognize the years. All I can say is – it looks lovely!
LikeLike
Thanks, Linda! I know I probably geek out too much about spotting past trends…but at least my outfit is finally done!
LikeLiked by 1 person
I think your fabric drawing turned out wonderfully! It looks great and makes your dress very unique! I also think the dress is lovely overall. Hopefully you’ll come around to liking it and wanting to wear it more, especially since it has other features you like, such as being comfortable and flowing.
Best,
Quinn
LikeLike
Thanks, Quinn, for the boost of confidence in this dress! I think I will like it better the more I wear and get used to it…I’ve only worn it one day so far for several hours. This dress has led me plan more fabric drawing projects!
LikeLike