Picture a breathtaking scene of a pastel colored, dramatic sunrise, eclipsing a lovely clear night sky setting of stellar sparkling in lieu of the light of day. Such a sight is sadly not to be seen most mornings. I see such a sight sometimes in our winter season if I suffer through the misery of waking up extra early and bundling up to brave the elements. Now, I can at least wear a vintage-inspired set that calls such a display to mind for me! To me, it has all the elements of one of my favorite paintings…”The Starry Night”, painted by Vincent Van Gogh in 1889. With a richly cobalt textured “sky” behind me, and colorful, swirling bursts of movement above a creamy pastel palate below, this Burda outfit is a means for me to wear art in my everyday life. Sewing can be an art form in itself, anyway.
 My first, real, riveting fascination with this piece from Van Gogh was through “The Christmas Wish” episode of the infant videos, “Baby Einstein”. When our son was one year old in 2013, we were given a handful of “Baby Einstein” DVD’s, and he would be just as relaxed and mesmerized as I was watching them. They would show details of “The Starry Night” by Van Gogh along to the music of “Für Elise” by Ludwig van Beethoven. This combo of picture and music has henceforth been intertwined in my mind, which associates both with something lovely which puts me in a happy place. This is partly why it seems so very fitting for me to take an old maternity tunic, and turn it into something which completes this artwork inspired outfit. My second and strongly passionate reason for saving my old maternity tunic is also the fact it is an old “Made in the U.S.A” garment, besides the wonderful feel and print of the fabric.
 Just as Van Gogh conveyed the sky abstractedly in his own personal way, I too probably see the world of clothing differently (I’m sure) than others. In my opinion this is due in no small part to my ability to sew and my studyies on history. In a sea of grey, black, browns, and whatever colors are popular with the dye lots for RTW any given year, I enjoy choosing a variety of colors. The world around us is full of color and beauty, and we all have our own individual beauty and personalities, so why not give that awesomeness it’s just manifestation through what we are wearing?! I wanted new skinny pants that were not another dark color – and how could such a lovely color not make me happy (especially with matching footwear)! The shop that my pants’ twill came from as a stunning variety of incredible colors, so why not pick some out for yourself and make something special that’s all “you”, like I did here!
Funny thing is, it seems as if the Versace line and I were of the same mind (though I made mine first)! Check out how scarily similar this outfit is from their Spring/Summer 2018 ready-to-wear collection! Look – it’s the same high-waisted, figure-hugging styled bottoms, in the same orchid-toned purplish pink…with matching shoes, too! In honor of the 20th anniversary since Versace’s murder, his sister has brought back a style for next year that commemorates both the styles of the 90’s and influential celebrities who were his friends.
However alike, my trousers are actually sewn using a true vintage 1957 release from Burda Style, while my top is only very vintage inspired. (I do see a slight 50’s air in a number of Versace’s items.) I’d like to think vintage offerings that come from modern patterns definitely help past eras transcend time to meld perfectly into contemporary wearing. Burda Style especially does a good job at “updating” the image of vintage re-leases! Designers’ rehashing the details and trends from the past also creates a whole new appeal, too, whether people recognize it or not. What goes around comes around is certainly true in fashion.
THE FACTS:
FABRIC: Pants: 100% cotton twill, in 7 oz. weight with a brushed finish on the ‘right’ side, bought from “ebpfabric” on Ebay (here is the listing); Top: a 63% polyester, 32% rayon, 5% spandex jersey knit refashioned from an old maternity tunic of mine. Some polyester jersey knit scraps leftover from this last Burda make went towards the facing for the neckline
 PATTERNS: Burda Style’s “High Waisted Trousers” #129, from April 2015 with Burda Style’s “Princess Seam Boatneck Top” #104, from February 2014
NOTIONS: I needed to buy the zipper for the pants, but otherwise the elastic, thread, bias tape, and small finishing notions were all on hand for everything else.
TIME TO COMPLETE: The pants took over 20 hours – I stopped counting after that amount! They were finished on May 31, 2017. The top took maybe 3 hours to make after maybe 3 hours of decision making about how and where to cut it out! It was sewn in one afternoon, on June 13, 2017.
THE INSIDES: Pretty nice! The pants have every seam edge individually covered in bias tape, while the blouse’s insides still have some of the original serging (overlocking), but the rest are merely double stitched over.
 TOTAL COST: I am counting the top as free because it originally came from a thrift shop, probably for a few dollars, almost 6 years back now. The pants cost me just under $15 for both material and zipper. That total is probably just as much as I would pay for the cheapest pair of RTW skinny jeans, so I’m counting that price as an awesome deal for the fit, quality, and fulfillment of personal taste that has went into my pair.
I will say first off before any nitty gritty construction details that I absolutely LOVE both of these pieces. These two projects might be the most versatile and my favorite Burda Style makes in a while. The fabrics are first rate quality, and the designs of the patterns something not too readily found in RTW. That said, they were challenging to make. The top tested my mind trying to fit in the pattern pieces on the existing garment, while the pants were horribly drafted (for me at least), requiring some pretty tiring fitting.
Now, as for any Burda Style pattern, printing and/or tracing is necessary to have a usable pattern to lay on your desired fabric. My pattern was traced from the downloaded and assembled PDF bought at the online store but if you have a magazine issue, use a roll of medical paper to trace your pieces from the insert sheet. It’s at this preliminary step that you pick out your proper size and add in your choice of seam allowance width. A scissor with a magnetic ruler guide helps immensely to quicken along the step to getting a finished pattern prepped. Sorry to repeat something you might already know, but this is just an “FYI” for those that don’t.
I’ll start with the bottoms. I must say they do run short. I cut them the given length of the pattern, and I really didn’t have any room for a hem besides a slight bias fold in for them to come to my ankles. This was the perfect length, but I wouldn’t have liked it any shorter. I’m about 5 foot 3 inches height so anyone taller than that, figure in to make the hem longer.
As I wanted a perfect body fit and ultimate practicality for the pants, I simplified the design just to the bare bones. A summary of my changes are no in-seam side pockets, no ankle zippers, no fancy waist facing, and a zipper right where I can see it…in front. For my next pair of pants from this pattern, I think I will draft a conventional zipper fly, but for this first pink pair they have an invisible zipper up the front to make them easy (versus up the center back as the pattern suggests – how awkward). To support the top of that zipper, inside at the top there is a small strip of cotton velvet ribbon (for softness!) to act like a tab placket, with a waistband hook-and-eye to close the waist. The waistband itself was made by stretching a strip of ¾ inch elastic down to the top edge, then folding it in twice and stitching that down for a wonderful body hugging, but stretchably comfortable and smooth-waisted option.
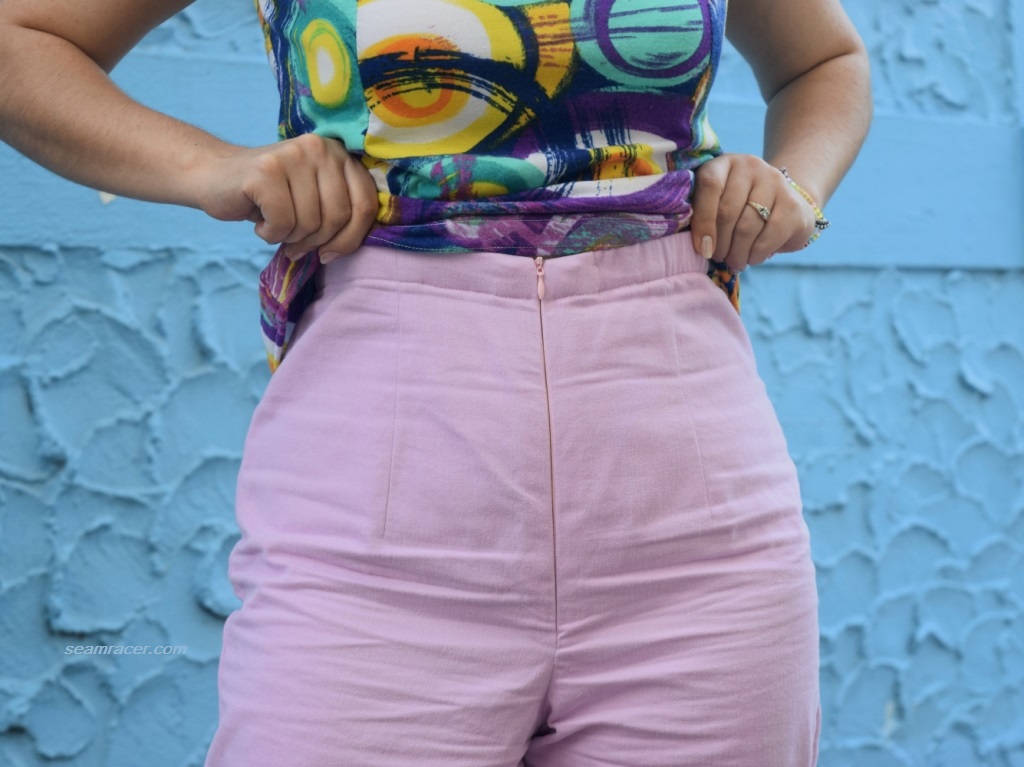 Go ahead and call me “granny pants” because these are wayyyy high up on my torso! I like them that way. Come on, ladies, honestly – I’ve heard the truth from many women I’ve talked to in in town who’ve told me they like my pants. Nobody really likes to spend their entire day picking up their drawers every time they move or bend! I know I don’t like the feel that my clothes are falling off of me. With high-waisted pants, there is no awkward bulge in the wrong place (muffin-top, anyone?) just smooth waist and hip complimenting.
Hips are an excellent pivot point in women’s garment design and the decade of the 1950’s used that point to perfection – that wide spot we all love to hate comes in handy when you think of it as an anchor point. A garment with a central mainstay above hips will stay in place…on ‘em, style has more of ‘sliding’ effect without the right styling. Now granted, if you want something that sits at the hip, that’s fine too. I wore everything at my hips as a teenager and still wear hip-hugging pajama bottoms. I just think store offered RTW generally doesn’t offer much that will be most complimentary to an individual figure when it comes to a variety of pants’ fit, at least not like something made for oneself. Only you know your body the best, and embrace that in whatever you feel makes you the best. I like to go with my hourglass shape, and let my hips and high true-waist anchor my pants on my body, whatever the negative connotation for this fashion.
 Keep in mind the fabric I used for my pants are non-stretchy – the twill material has little to no give like a knit might. A really good, sturdy, quality twill that feels and performs like a denim that will hold its shape is what I wanted and used – especially since a material like this is impossible to come by in any in town store. A non-stretchy woven is what the pattern called for anyway. I can definitely see this pants pattern being much easier to make in a knit and turning out fabulously, so there’s a lot of versatility here.
The real secret to my fitting technique was to sew the center front (with the zipper) and the center back seams, then turn the pants inside out and have the side seams and inner leg seams pinned to fit around me. This was a bit more challenging than it had to be because I was working on it by myself, but I really think this is the easiest, quickest, least painful way to get a body fit. It would definitely be even easier with someone else’s assistance. Once a good fit is pinned into place I marked the seam lines on both sides with water soluble disappearing ink pen, following that line for my stitching and washing it away afterwards.
As my fabric has no stretchy ‘forgiveness’, just to be on the safe side in the unforeseen chance that my body changes and I need to refit these trousers, I left a wide seam allowance…not a whole lot, but 5/8 to ¾ inches along the sides and inseam. The thick denim would feel and fit a tad better I believe without the wide seam allowances, but having the possibility to keep what I made (and love as a wardrobe staple) for the long-term is something more important to me.
Speaking of items that endure from one’s wardrobe, I’ll move on to the top re-fashion. My first step was to cut off the elastic empire waist for the tunic. The body of the tunic became the bodice for my new top while the bust and sleeve sections managed to also be the new top’s sleeves. Only because of the skinny princess seamed panels was this able to be fit in on what I had. I did have to shorten the length of the hemline by two inches, but luckily that was the only way I had to “give in” and make a change for this re-fashion to work. I like a shortened length anyway! Too much fabric in the body might distract from the lovely off-shoulder sleeves.
 The sleeves are really made of interesting pattern pieces of small rectangles curved dramatically on one side…and it turns out just wonderful! I can completely adjust where I want the sleeves to sit on me for a slight change of look – I can pull them completely off the shoulder, or pull ‘em up like “normal” sleeves, but where they naturally sit on me is right over the angle where my shoulder ends and my arm begins. Now, the back neckline did turn out a tad generous and it sometimes looks like a draped neck, but I’m okay with that. The one major caveat is that strapless lingerie or a bandeau bra is needed with this style.
Both of these pieces can be similarly found in vintage patterns and some vintage reproduction garments, which why this is included as part of my ongoing “Retro Forward with Burda Style” post series. The pants are already vintage from 1957, I know, but I’ve seen several patterns that remind me of their same style (see McCall’s #9221 from 1952 and McCall’s 4024 from 1957) so I just had to share! In fact here is an interesting article to read, making me think that my pink trousers are technically “cigarette pants” or “stovepipe pants”. The blouse seems to be a recurring style in the decade of the 50’s except they seem to call it, “a scoop neck, with cap sleeves set into armholes”. See Vogue 8100 from year 1953, Vogue 9643 year 1958, an unidentified 50’s playsuit pattern, and “Unique Vintage” company’s 1950’s Marilyn top in either plus size or misses size for a few examples.
 Ever since the most recent total solar eclipse several months ago (we were in the path of totality), I can actually look at this set’s inspiration in a whole new ‘light’! That afternoon for us was truly a starry night in the daytime! On a factual level, did you know Van Gogh actually painted “The Starry Night” from mental picture, as it was done during the day? So my title is right on! Do you have any artwork related creations!

Your whole outfit looks great. I particularly like your shorter version of the blouse. The model looked like she was losing the shoulders, rather than artfully draping them, which put me off. How they sit on you looks great. The knit you used looks better than the woven fabric Burda used too.
LikeLike
Thank you, Karey! Your comment is appreciated, along with your kind compliments! The model picture was a big turn off for me, too, but I am glad I choose this pattern anyway. I can’t say why it looks better on me or what I did different than the model version – I made it “as-is” in my size. Maybe like you mentioned, it’s because my fabric is so drapey.
LikeLike
You’ve got a very nice outfit there! I love the colours of your top. And yes, I like a higher waisted pant – for me, it just seems to hold me together better!!!
LikeLike
Yay! Someone else who likes a higher-waisted pant! It does keep me in, too, and these skinny pants are sort of like a mild spanx, yet much more comfy! Thank you for commenting, Linda.
LikeLiked by 1 person
Pingback: One Shot | Seam Racer
Pingback: Origami Neck Blouse | Seam Racer
Pingback: A Very Mod British Summer Sun Suit | Seam Racer