I told you a handful of posts ago, in the write-up on my second Easter outfit, that I have been weaning myself off of an obsession with peplums. Of course, I am biased towards thinking that vintage fashion offers the best peplums, but I just couldn’t resist testing out a new Burda Style one that caught my eye. Can never have enough of something good, I figured, but this peplum is not a fantastic as I had hoped yet it’s still an awesome casual me-made to reach for over the next several months. Happily this multi-season (spring, summer, and fall) creation that is loose, comfy, and one of those wardrobe staples which is seeing more wear already than I’ve expected.
 Burda really has been offering the best asymmetric patterns over the last several years, and I love such styles. I enjoy the creativity of asymmetric styles, and generally find them complimentary, yet they are not a commonly seen ready-to-wear design. Many sewists like me seem to muse that high production manufacturing and the cheap labor such companies employ (so, so sad) does not lend itself to asymmetric styles on account of the single cuts that are necessary and the extra thoughtfulness and care needed to make them. This is where the benefits of personal sewing come in – you can make things you can’t buy (and make them better)! Asymmetric styles still take more thought no matter where or how they are made but at least they can be made just the way you like them in your hands!
 THE FACTS:
FABRIC: a 100% rayon challis
PATTERNS: This top’s design is divided out into two almost identical patterns from March 2019 – Burda Style “Flounce Sleeve Blouse” #111, which has shorter sleeves and a longer hem, while Burda Style “Gathered Paneled Blouse” #112, which has quarter length sleeves and a shorter hem.
NOTIONS: I used everything I had on hand – black thread, some interfacing scraps, elastic, a hook-n-eye, and one vintage button from hubby’s Grandma’s stash of notions
TIME TO COMPLETE: This took me only 6 hours to make and was finished on May 9, 2019
TOTAL COST: As this was half of the fabric ($30 in total cut), my top was only $15
 Even though you’d never guess upon appearances, this is really a happy scrap busting project because it is also part two of a really fancy Burda dress I made last year – the Andrew Gn mermaid gown. Half of the width was the butterfly print I used on the back of that dress…the other half of the width is this blouse now! It was weird to have fabric leftover in this 29 inch width, and have 3 yards long of it, and the cute and predictable floral print was something rather “meh” for me, so I was excited to use it up on something interesting and experimental sooner than later. I rather wanted to try a border print for this design like they show on #111, but my border fabrics are too precious to me for trying on something (like this post’s blouse) which I’m not positive from the outset that I’ll like. There was a slight “border” to the fabric I used, after all – a bright green stripe was the printed division line where the butterfly print and the floral were separated. I used that stripe as some sort of waist definition.
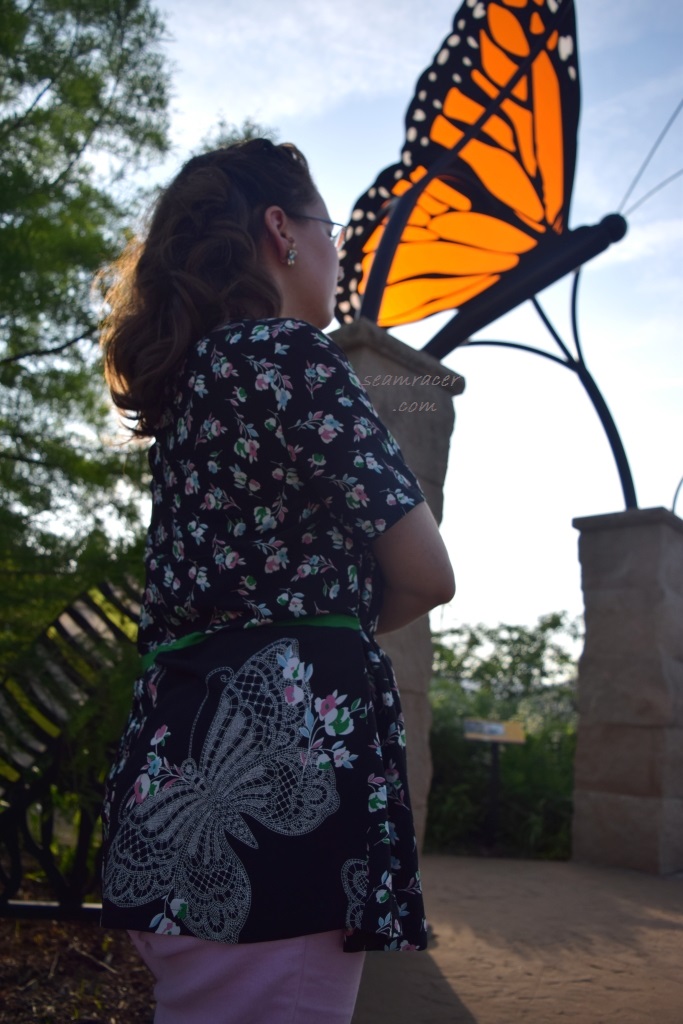 Ever since the Schiaparelli inspired summer set I made back in 2017, butterfly prints keep catching my eye and popping up in my sewing projects, but the previously posted Burda outfit was made back in 2015 so maybe my fascination with the delicate creature began earlier than I have been thinking. Anyway, as one small segment of the other half to the fabric was still around, I couldn’t help but incorporate it in some small way! The right side back that is all one piece (no separate waist seam) has a large butterfly over my booty. Luckily the waistline was marked on the pattern, otherwise I would not have been able to line up the green stripe in the fabric to make such placement work!
 More or less, if I had made this blouse exactly as the pattern directs, it would have been an overwhelming, uncontrolled tent of a top. I’m not against loose and flowing styles, but I like some distinction to such a top with a whole lotta fabric and the busy floral hid the design lines all too well. At least I had that green stripe where the peplum meets the waist. The stripe ends where the peplum panel extends all the way up to the shoulder and gathers asymmetrically into the bodice. The blouse’s print, as it turns out, goes with my pastel skinny jeans and a few pencil skirts so it’s a win, after all, especially as it pairs perfectly with my grandma’s necklace and earrings, too!
 I couldn’t stand just leaving the top as it was, but I didn’t want a permanent solution. So I had an elastic ‘string’ loop come out from being threaded through the right side seam. It can bring the asymmetric peplum panel in to a controlled but stretchable and optional fitted look when I take the end of the elastic loop to close it on the matching, indistinguishable button at the end of the front stripe. Poof! One little add-on and suddenly I am so much happier with the top, its styling, and fit. Yet, I can still wear it as it was intended. No commitment tweaks to fix a ‘problem’ are awesome. Hubby liked the top as it was, I wanted to change it – so I found a compromise and a great use for a random spare button! It’s so nice to have to not install a zipper every now and then.
 Otherwise than the tweaking the overwhelming peplum, the rest of the top had some slight fitting problems. The sleeves, that I made basic short style, are slightly restrictive with reach room. Even the shoulder line is a tad further in than it should be. The neckline was chokingly close so I opened up by about an inch. As I said, this was a quick, experimental make that is like a wearable muslin so I’m fine with such little deficiencies that I would never deal with in my regular sewing projects. Just be warned if you want to try this for yourself to check it out on yourself carefully before cutting.
I did expose the back neckline opening more than directed to counteract the high, fully covered bodice. The slit opening goes down about 8 ½ inches on my tops back, with a simple hook-n-eye to close the top edge. I like a little oh-la-la view from the back, even if it’s just a little peek!
 This might not be the best peplum I have made but I’m glad to have tried it. Just when I think my peplum craze is satisfied…nope, something else catches my eye. It will have to be a really good design to tempt me next…but my defenses for a peplum are still weak apparently, as well as for any asymmetric style. At least I will have the best peplum collection ever if I keep this up! I will be posting more of my peplums both here and on Instagram over the next few months.

I’ve been eyeing this pattern off and I’m delighted to see it made up.
Love your creative use of remnants and your solution to control the overwhelming peplum. I was thinking that the looseness of this style would work well with my perimenopausal figure, but perhaps its a bit much.
LikeLiked by 1 person
Thank you for your comment! I really don’t think the pattern is all that bad and it certainly is comfy! I think that this style will probably look better as-is (without my changes) on other people and other bodies besides myself. I was thinking, maybe a sheer fabric might be best for this because it would highlight the beauty of the looseness and still half-reveal the body underneath..or maybe just a solid color. Are you still up for giving this a try?
LikeLike
It’s still on my probably will make it/to do list. I have a lovely drapey solid blue fabric I’m thinking of using. It’s not sheer but a sheer is an excellent idea.
LikeLiked by 1 person
Your efforts certainly paid off. You’ve got a lovely top there. I love the peplum shape too, but I have a tough time trying to find the right pattern. Nice to see this one sorted itself out for you!
LikeLiked by 1 person
Thank you, Linda! This one was tough to get sorted out…
LikeLiked by 1 person
Pingback: Peplum on the Backside | Seam Racer