Sorry, but this is not a name for an unusual kind of motor vehicle, it’s just referring to an unusual, yet very useful and attractive kind of garment which I have made! I now have a pinafore dress whose “top can come down”.
 Don’t take that the wrong way – all I mean is that this 40’s pinafore has been made so that it can come apart to be two separate wearing pieces if I so desire. After all, as much as I unabashedly wear this pinafore set out and about, I’ll admit it’s not something I’d want to wear in its entirety in every social setting. This way, I really don’t have to change completely…just change tops for a new and updated look. Such a dress, made the ‘convertible’ way, completely transcends the almost 80 year time gap, making it truly something that is ultimately useful and sensible…the goal of a pinafore anyway. I believe I have nailed a way to bring the pinafore to the modern wearer. I managed this outfit all on 2 measly yards, too.
Guess what makes this even more up-to-date? There is a hidden division to this pinafore where the top and the skirt attach at the waistline – above it is authentic to year 1941, below it is a modern Burda Style pattern. Together, they both complement one another to the point that they even the other out, like a good marriage. I see the modern bottom making the vintage top more like a trendy “Shabby Chic”, and the ’41 pinafore top bringing out subtle past references from the current design. Separate, each of the two pieces work well with others (in my wardrobe I mean) making sure one or the other sees the light of day more frequently than not. As much as I make what I like, I do always try to make garments that are still practical on some level to keep things from just hanging in my closet. After all, there’s no use in making something to wear if you won’t wear it, right? And remember – having the gift of sewing open up the opportunity for limitless ideas and customization.
If you haven’t seen my previous post, or if you haven’t encountered this weird ‘thing’ I’m calling a “pinny” (which is short for pinafore), I’d recommend you head on over a read it, please, for an explanation. Face it, a pinafore is smarter than modern clothes anyway, because at least it has giant pockets that really do fit a smartphone (little would a woman of the 1940’’s have guessed such a use)! It’s every bit just as comfy, probably more so in my estimation, and a lot more fun! Finally, the way I made it, all I can say is thank you to the person who invented snaps and hook-and-eyes, however, because otherwise this two-piece dress would not have been possible!
In most pictures, I am pairing the pinafore with a vintage rayon scarf to keep my hair in place, and a vintage necklace of mother-of-pearl oblong beads with matching mother-of-pearl carved earrings from my Grandmother. My newest favorite shoes, lovely Re-Mix “Dara” 40’s style wedge sandals in burgundy red, are a comfy and colorful option for casual class! I am also sharing some other photos of just a few of the endless outfits that match with my new favorite me-made – this pinafore!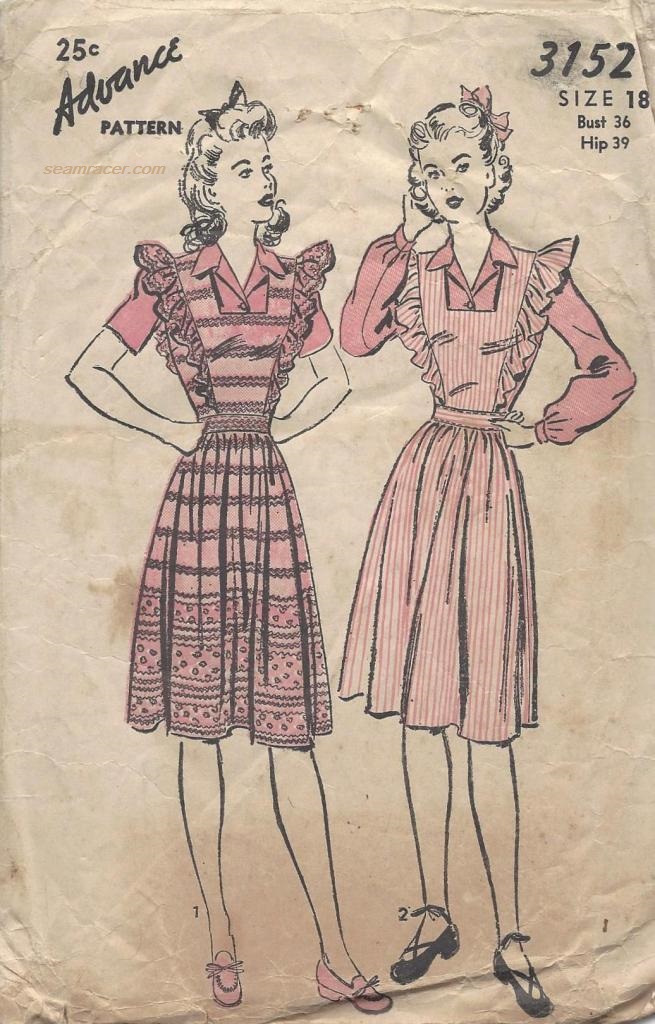
THE FACTS:
FABRIC: 2 yards of 100% rayon challis floral in rose garden print, with a solid navy 100% cotton broadcloth for lining the skirt pockets and underside of the pinafore top body
PATTERNS: Advance #3152, year 1941, for the top pinafore bib half, and then Burda Style’s “Pocket Skirt” #105, from February 2017, for the bottom half
 NOTIONS: I used a card of size 2 snaps as well as 4 of those flat, slide-closed, waistband-style hook-and-eyes around the waist. I used PLENTY of navy thread, and a little interfacing along with some mesh netting as another kind of stabilizer (more on this down later). There is a vintage metal zipper for the pinny bodice, and a modern zipper for the skirt (even my zipper choices attest to the fact of which part of my dress is vintage and which is not). Everything I used was extras on hand and came from my stash.
TIME TO COMPLETE: This was made in July 2017 in about 15 to 20, which is not bad at all for all the gathering and extra trouble to make this into two separate garments. This sound cliché, but to tell you the truth I wasn’t really counting time because I was enjoying myself…until it came to the snaps and hooks…ugh!
THE INSIDES: So nice and clean! All seams to the whole dress are either covered by fabric facings or in bright, rich burgundy red bias tape. I do love the flash of color the bias tape gives when my tiny hem is seem as my skirt blows or I sit and bend over. Surprise!
TOTAL COST: This fabric was bought from Jo Ann’s store for about $12 and the cotton was just a few dollars more.
 After my recent jumpsuit that I divided up into two pieces, I kind of knew the premise of how to make my pinafore a two-in-one. The biggest complications were the facts that both top and skirt of my pinafore needed zippers, and the droopy challis wasn’t going to cut it as stand-alone ruffles without a supple support. The skirt was whipped up first – practically a few hours in one afternoon – and then the pinny came in second. As I was making this pinafore, I was severely doubting whether this was a total waste of time. I’ve never really made a pinny before, unless you count my Dorothy from “The Wizard of Oz” apron, so how did I know that I would love it once it was done, tried on, and accessorized?
 The pinafore pattern I used was in a size too big for me, and, from my experience, smaller brands like Advance run on the large size. However, as this should also have the capability to be worn over a blouse and be loose and comfy anyway, I only cut off 3/8 inch (the seam allowance amount) from the side seams and it still ran roomy with my sewing in ½ inch allowances. I went a size up than my “normal” Burda Style skirt size, to match with the roomy waist of the pinafore top. The generous waist pulls in nicely with a belt when worn alone, and doesn’t need pulling in when it’s attached as part of the whole pinny. The awesome belt loops save the middle of my divided pinafore.
 Technically I could count this as part of my ongoing “Retro Forward with Burda Style” blog series because the skirt’s lovely arched pockets have continuous cut-on belt loops for the waistband much like several 40’s patterns I have come across. Advance 4344 or Vogue 7519 have very similar pockets. I faced the entire wrong side of the pocket in the navy lining cotton, and it’s a good thing because the pockets have a wonderful flare out to add shape to the skirt silhouette besides also making sure they don’t get lost amid the rest of the busy print. I added a center back belt tab to the waistband as well, to make sure wearing a belt actually keeps things in place.
Those awesome ruffles are hiding a neat trick I tried out for a new kind of interfacing. In order to make the rayon challis keep its shape without the stiffness or fuss of applying interfacing, I used wide mesh tulle netting. I’m talking about that see through stuff that is in a million different colors, and is formed in honeycomb design. I bought some already to use as crinoline for another project, and it worked well. For the pinafore, navy tulle is in the front center and back center panels of the bodice, sandwiched in between the rayon and the navy cotton lining, giving the body a nice semi-firm bib fit which would gently keep its squared off shaping.
 There is a layer of tulle in each of the over the shoulder bodice ruffles, as well, in between the lining and fashion fabric similar to how I did it for the body panels. Because I under stitched the ruffles’ outer seam allowances to the lining cotton, the outer edges are thread free, clean edges. I was initially worried at how the tulle would gather along with all the layers in the ruffles, but sewing them was no harder than any other gathering I’ve done. The trick to having the ruffles lay perfectly over my shoulder, away from my head, was to direct the seam allowances the right way for this on the inside and then invisibly “stitch in the ditch”, through all layers – floral rayon, tulle, and cotton lining – at the base of the ruffles to keep everything in place. Keep in mind the pattern never said to do most all of these steps that I’m explaining – the tulle interfacing, lining the ruffles and bodice, and even stitching through the seam lines – but my pinafore top is so much better for it. Sometimes overthinking can get me into trouble, but this was a case of merely thinking a project through, I believe, from how well my ideas worked to improve some potential ‘problems’
  with my fabric choice. Sometimes, I do believe sewing is truly a branch of engineering.
I can find no clear explanation for the very frequent use of ruffles on pinafores, other than the fact that it probably comes from their relation to both the child’s garment as well as the folk-influenced fashion of the dirndl. 1940s pinafores, peasant styles, and dirndls all can employ ribbons, lace, rick-rack, felt appliques, or embroidery for optional decoration so ruffles on a pinny were probably added for the same reasons as the rest of the embellishments. Remember that even though a fashion dirndl is officially a skirt, the Germanic form does include a bib-suspender combination which unifies the whole thing, and the blouses to be worn under them could have the frills instead. Peasant blouses and dresses can be somewhat obnoxious, oversized, and frilly like a pinafore, too, besides the shared fact that the adolescent crowd made them popular. Even if adults wore these fashions they were supposed to bring on a ‘youthful’ connotation. The cross-over is unexpected perhaps, but worth consideration, I believe. I’m guessing, though, the use of these embellishments for a pinny could merely stem from the simple desire to jazz up a basic garment meant for work and maybe play.
 The system I devised to close and connect the waists of the two-individual pieces into one might look and sound like a convoluted mess – but really it’s not! Both the top and the skirt each have their own side zippers, with a hook closing tab at the end like any garment. The bodice closes on the right while the skirt closes up the left so that the two zipper wouldn’t end up overlapping each other. In between the two sides of my waist, is a predictable pattern of two snaps and two hooks as well for each front and back, with one extra under the center back skirt belt tab. That’s about 9 extra closures! All of this hand sewing and measuring needed for this finishing of the horizontal waist band connections was such a pain in the neck, I really was gritting my teeth not to give up on my idea completely. Finished now, I’m in no hurry to do this again but as much as I love the versatility of this divided set, my guess is that I’ll do this kind of thing again soon enough. Many bib-style pinafores were button on and off in the 1940’s, but I wanted something that would give a stronger hold like the combined effort of hooks and snaps.
 You might be wondering, “How does she get this thing on like that?” Quite simply, much like any dress, except that the front waists are hanging separate and the back waist is still connected as one. Once on me, the bodice is zipped up, the front waists are connected together around over to the other side of me where the side skirt zip is then closed. Nothing quick, but it’s not complicated or fiddly – just methodical and definitely sort of a unique experience.
If you follow my Instagram account, you might have seen back on March 14, I posted a picture crushing over this dress’ fabric right after I bought it. Then, I planned on pairing it with an orange/peach coral toned polka dot cotton for a matching blouse. Yes, I still am holding to my plan – it’s just that with so much else to pair this dress and its separate pieces with, I’m in no hurry now to make the polka dot blouse. When I do sew it up, which I plan on that being no later than spring of next year, it will be made using a vintage Simplicity #4734, year 1963 “action-back” bowling blouse, to totally see how far this set can work with any decade of fashion. I have high expectations it will work…this set keeps amazing me. It literally works with just about anything and has unlimited styling capabilities.
Hollywood has not shied away from using pinafores on their best actresses with amazing, complimentary success. The 1940’s seems to have the most instances so I will focus on actresses and films from this era, with half of my inspiration in this pinny post, and the other half in my next. First, the cheery and beautiful Donna Reed can be seen in a 1940’s picture wearing a pinafore dress very similar in style to my own. Next, there is a lovely Loretta Young who wore a classy and dignified long length pinafore in the political version of a Cinderella-story movie, “The Farmer’s Daughter” from 1947.
 Finally, the best I saved for last – the 1942 movie “The Major and the Minor” with Ray Milland and Ginger Rogers. This hilarious film has the best and the most examples of pinafore wearing in any movie I’ve seen yet – I counted at least 5! What I appreciate about the pinafores in this movie is the persona Ginger Rogers puts on with the pinafores she wears. Most of the time her pinnys are worn when she attempts to be mistaken for a 12 year old, but towards the end of the movie she dons a pinafore smock to be mistaken for her own mother! Being an awkward, no-makeup wearing pre-teen is not something anyone can think of as being the elegant Ginger Rogers, but her talent is supreme, so her pinafores ended up giving me a good idea of how a pinny is youthful, but still can be styled well enough for an adult woman to be charmingly complimentary. I see the sheer plethora of pinafore styles (each of them is different) as a tribute to her face and figure, the costume designer, and the fun, playful theme of the movie. I am amused at how a slightly different style of pinafore is used to designate her as being dignified, comfortable, and respectable older woman – different pinafores for different duties and different places in life. How interesting – I wonder if this was the case in real people’s social world, too! Either way, thank you, Hollywood for helping my inspiration!

For some modern options, Simplicity Pattern Company has recently been offering pinafores, smock dresses, and apron-style garments with the Dottie Angel patterns, such as #8186, #8230, #8438, and #1080. Even Burda Style has an apron-style top – Pattern #132. For more pinafore inspiration throughout the past decades, please visit my Pinterest board. Until then, my next pinafore post will be following soon!

I love the shoulder bodice ruffles – and your idea for the interfacing. It’s so nicely finished.
LikeLiked by 1 person
My idea for the interfacing was one of those happy experiments. I thought it would turn out how I wanted, but still – when it really does, I’m so happy at surprising myself! Thanks, Linda! You know, when I wiggle my torso the shoulder ruffles have so much body on their own it really makes for a humorous scene!!!
LikeLiked by 1 person
Pingback: Living with Coral | Seam Racer