Burda Style Retro Wrap Blouse and Pleated Skirt

     This me-made blouse and skirt set just makes me happy!  I enjoy the touch of casual with an air of refinement that still keeps these two pieces classy no matter how they are paired.  Burda Style’s “retro” patterns do well at helping me carry this unique sophistication every time I sew something from them.  Happily, the style of the two pieces in this post are rooted in the sportswear of the post-WWII era, a fashion niche that I can never go wrong with!  The early 1950s decade, in particular, had great easy-to-wear clothing that was practical yet polished and feminine with a flourish, as can be seen with the reprinted patterns I used.  It is wonderful how fresh and timeless the styles of the past can be for today.

     Burda’s retro releases are good at seamlessly melding styles of the past into today’s fashion, but I often only take a more authentically vintage interpretation.  This time, my use of modern materials with an eco-conscious approach really helped me bring them into a new light.  The blouse was made from poly scraps found second-hand and the skirt employed a modern blend remnant from my long-term stash.  These may not have been my preferred choices of materials, as I recently become partial to more breathable natural fibers.  However, these separates were a great way to use fabrics on hand that I previously had no idea what to do with.  Together, I now have an outfit that I love, which doesn’t wrinkle, washes well, and pairs nicely with the rest of my wardrobe (when each is worn individually).  I will keep whittling down at my stash of acquired fabrics by turning out pieces to enjoy for years to come.  Compliments frequently come my way when wearing either of these items.  Such happenstances are taken by me as further proof that these projects were meant to be sewn!

THE FACTS:

FABRICS:  a pebbled finish polyester crepe for the blouse and a cotton and rayon blended “linen-look” material for the skirt

PATTERNS:  Burda Style “Patch Pocket Wraparound Skirt” pattern #109B from February 2015 together with Burda Style “Retro Wrap Blouse”, originally from August of 1950, but re-released as pattern #134 in May 2014

NOTIONS NEEDED:  lots of thread, one vintage metal zipper (which was to accommodate my changes to the blouse pattern), some bias tape, and scraps of interfacing

TIME TO COMPLETE:  The blouse took me 10 hours in November 2020 while the skirt was sewn back in April 2015, in 6 hours.

THE INSIDES:  cleanly bound in bias tape

TOTAL COST:  The fabric for the blouse was only $1, all notions were second-hand acquired and already on-hand, while the skirt’s fabric is as good as free to me, being bought 15 or more years ago.  The skirt only calls for two yards, and the top can be made with scraps that amount to a yard, so both items could be made on a very reasonable budget, even if I had paid full price for new fabrics!  I count this as a $10 or less set, the way I made it work.

     Because I like to choose sewing projects which will be some sort of challenge to my skills, the skirt and blouse both have unique construction methods behind their design lines.  This gave them a surprising level of difficulty.  The skirt’s complexity is hidden in some unassuming details, and the blouse has a flourish at the neckline which is not crafted as one might expect.  Vintage garments are great at having surprising details like this, and this benefit is one of the many ways that the designs of the past are so endearing to many sewists. 

I suspect that the skirt is not an original vintage design.  Nevertheless, the silhouette, the details, and its wrapped closure method are all straight out of garments and sewing patterns which date from between 1940 to 1952.  The blouse is supposed to be a reprint from a Burda Style magazine of August 1950 (as I found out through the blog “Doctor T Designs”) for a great pairing from within the time frame just mentioned.  It seems to have kept most of its original construction details despite being modernized in its sizing for re-issue.  I still prefer working with true vintage designs, yet, as a modern option, I love to tackle these vintage-inspired Burda Style patterns!  

Just look at that interesting wrapped closure method!!

     It was fun to “wrap” my head around the idea of the skirt.  It is a tie-on design that utilizes a front box pleat that is divided into two separate folds.  The one box pleat fold is top stitched down to the skirt and sewn into the waistband.  Then, the one open box pleat has a vertical slit which extends down the inner (and therefore hidden) fold.  This design helps the skirt to be both adjustable in fit as well as free of a zipper, button, hook, and snap.  Super long ties keep the skirt closed, with one tie popping out from underneath through a little ‘window’ in right side of the waistband.  The ties are so long, I can double wrap them around my waist to knot in the front, or leave them in a large bow in the back.  Thus, as you can see, a soft but stable fabric is essential to this design.  There is the need for structure to keep the straight-lined silhouette, while also being supple enough to work well for manipulating the waist ties.  

     The box pleat folds meet in varying degrees based upon my measurements for any given day.  Do not expect consistent perfection in the fit of this skirt if you decide to try it for yourself…something I wholeheartedly recommend.  Sometimes the front folds meet precisely together, other times the folds slightly overlap (when I am thinner), while other times there is a small gap between the box pleats.  This is why choosing a size for this design is sort of tricky.  An adjustable fit for a design like this is not going to show a consistent match across the box pleat.  Bodies are changeable!  Understanding this, and giving myself grace to accept my body as it is, helped me both understand and enjoy this amazing garment.  If anyone else notices that something is off with such a small detail as the box pleat folds on my skirt, they are too close for comfort anyways.

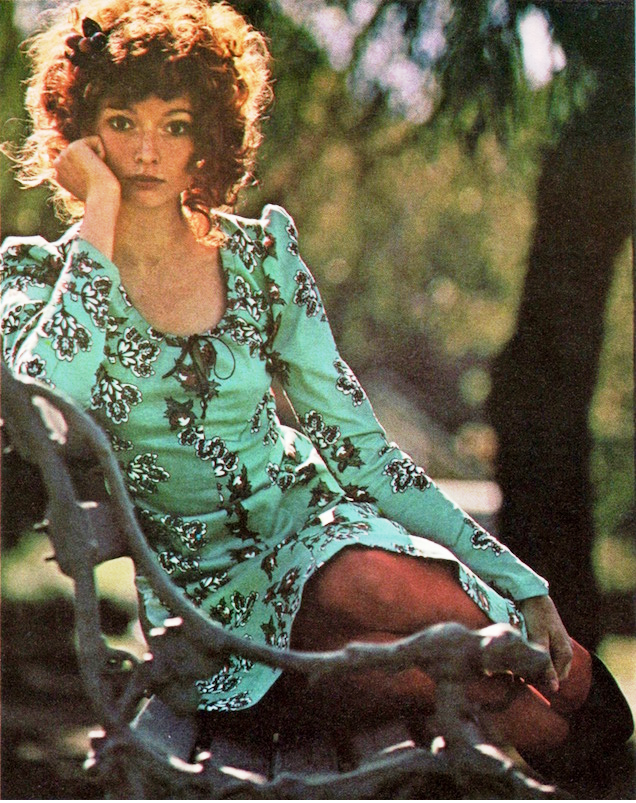
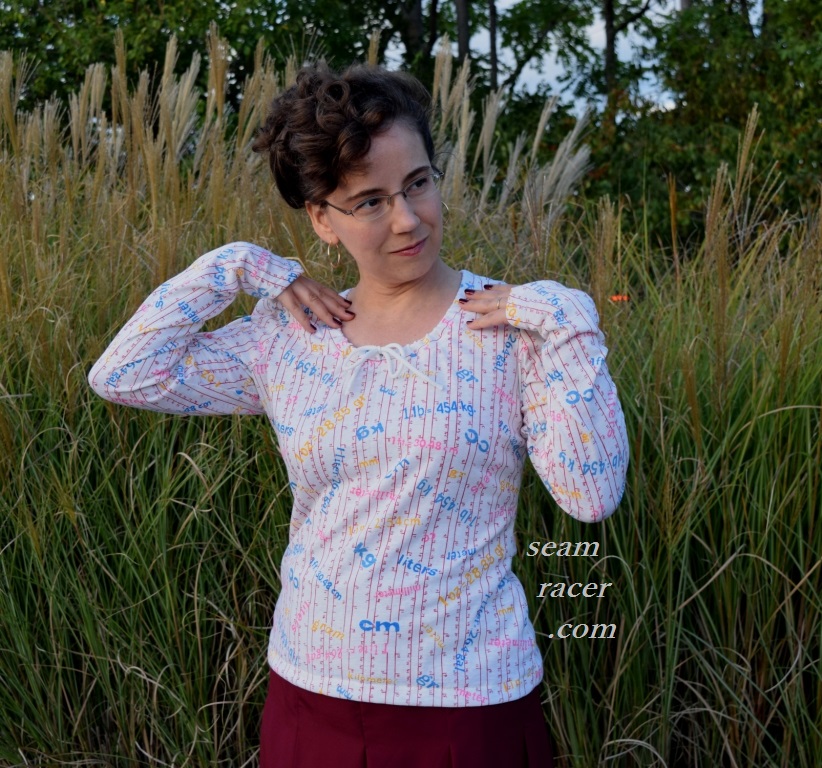
     The blouse had a construction method which was much harder to comprehend.  Once I dove into actually making it, the blouse suddenly made more sense.  However, it wasn’t until I got to try it on that I fully realized how the design works.  The front neckline flourish is not straightforward and it is up to the individual to tailor the look of the tie, so this adds to the confusion.  The one side of the front has a tube, while the other side has a long tie.  That tie gets folded over in half and the fold is pulled up (towards my chin) into a pouf, while the free end hangs down.  This is the way the pattern, the model image, and my own pictures in this post all show the front closure being managed.  Nevertheless, I found many other fun ways to play around with the front tie design, offering the ability to change up the front of this blouse for a fresh look every time it is worn.  It’s no wonder I gravitate towards versatile and adjustable designs in my sewing adventures!  It really makes for a wardrobe out-of-the-ordinary as well as clothes which work for my changing bodily needs and tastes.

     I did adapt the design, though, to eliminate some of the adjustability to the fit since it struck me as mere extra fussiness to its closing system.  There already is a tie front closure to the blouse.  I felt that the waistline did not need to be wrapped closed, as well, leaving the entire center front seam open for confusion when dressing.  Furthermore, I could only envision a bulky waistline going under my skirts and pants, making my torso uncomfortable.  If I was using a chiffon, silk satin, light knit, or natural fiber crepe, than I might have kept the wrapped waistline.  However, the poly crepe was too stiff for that detail.  Besides, my clothes need to work for my every comfort or style preference, especially since I am the one sewing them!  Even if such an aesthetic decision hadn’t been made, my change to the design was ultimately needed to accommodate my extreme lack of material from working with haphazardly shaped scraps.

     The one-step fix I did to alter the wrapped waistline was to seam together the center front (below the tie) into a zipper.  I chose a sturdy vintage metal zipper from my late Grandmother’s stash of notions so as to honor the 1950s origin to the pattern.  The zipper is concealed completely under the fluffiness of the front neckline tie.  An inch or so under the bottom of the tie is the only part of the blouse front that is connected together in my adaptation.  Yet, since the zipper opens up, I can easily pop the blouse on without pulling the tie closure each time apart for a much appreciated ease of dressing.

I also added three horizontal tucks across the back to take out excess material and give my arms a controlled (yet decorative) ease of movement.

    Be aware that the blouse’s sizing did run small, and I easily could have sized up one whole number…or even two!  Such a snug sizing would make this a good pattern for a knit fabric.  However, the pattern instructions strangely did not directly specify whether to choose a woven or a knit.  The instructions merely called for “fabrics with some body” which have two “good” sides.  My poly crepe did fulfill these needs, but a little more forgiveness in the fit would have been appreciated.  I am not used to having zero ease in a woven garment, yet the tie front and almost sleeveless design are the saving features that provide some flexibility to the blouse.  The snug fit does keep my blouse in place, as I can see it twisting around on my body otherwise…so maybe the sizing is correct after all.  Such a tight fit just makes my blouse seem more modern than vintage to me, for whatever that fact is worth.

     This set, for as much as I love it now, was rife with indecision along the way to completion.  The first was in regards to my choice of color.  Unless I am working with a complex pattern that has design lines which need to shine, I am often afraid to choose solid colors for my sewing.  Not only do I have a hard time choosing solid colors to commit to, but I also fear an unbroken tone will only let most of my chosen designs fall flat.  Yet, in this case, I think the plain, soothing earth tones lends them to being useful yet also standout wardrobe items.  Then, I was unsure whether or not the enormous pockets would overwhelm the skirt silhouette, and so they were the last thing I stitched down before calling it finished.  Yet, how could I not fall for such a feature handy enough to hold a book, a wallet, or a drink?!?  These are the gold standard example in pockets, second place to the ones on this vintage 1930s smock frock (posted here).  The pockets are just about the size of the modern “fat quarter”.  I can envision some fun contrast fabric for these awesome pockets on another version of this skirt.  This “PatternReview.com” member (post here) decorated her pockets with embroidery!

     Ready-to-wear rarely sacrifices so much extra fabric for pockets, but this is the kind of thing that women really want from their clothing, more often than not.  Also, ready-to-wear rarely offers much variety when it comes to colors.  I am very picky when it comes to what solid colors I like, especially for brown tones (since I already have brown hair and eyes).  Using second-hand fabrics that have been around already lets me find greater individuality and cater to my personal preferences.  Sewing my own wardrobe is really the only way I can wear clothing that helps me feel like my best self and comfortable in my own skin.

     I’m glad to have pushed through my hesitancy and went along with the best decision I could make at the time.  Often, all it takes for me to see how successful my sewing efforts were is to dress myself in my newly finished garment and accessorize the outfit as if I was ready to go out.  Then, my mind can turn to relief.  Yet, I also see how my doubts were a waste of mental energy.  Sometimes, I have a limited predisposed ideal and find a surprise awaiting me at the time of finishing (as was done here).  For other projects, a set ideal is perfectly achieved through my sewing, while others times I fall short of my goals.  Nevertheless, I always make sure I end up happy with what I made, after it all.  Every one of my sewing projects is such a rewarding experience in resourcefulness, self-confidence, and finding individual expression.  For those of you that sew, what does the creative process mean to you personally?  For those of you that are not “makers”, how do you curate a wardrobe that can more closely reflect your individuality?  Do you enjoy garments that are both versatile and adaptive, like I do?

An Updated Spencer Jacket

     This post will take you to the beginnings of the Regency era…only to show you an example through the lens of modern fashion!  Historical garments are often just too pretty to be relegated to living history or “dress up” events.  However, I want to incorporate styles of the past into my wardrobe in a way that learns of their source as well as finds a way to individually express what wearing them today means to me.  I am throwing the approach from my previous post (seen here) in reverse (literally, as I used the opposite side of the fabric).  I put an updated spin on a historic pattern this time, starting with one of the most quintessential and easily recognizable garments of the Regency era – the Spencer jacket.  

     This is an odd name for a piece of clothing that is probably visually recognizable in some manner for many people.  A Spencer jacket is a piece of outwear that ends at the high waistline (sometimes as high as under the bust for women) and closes across the chest.  It paired well with the above normal waistlines to the dresses for women and knee breeches (or pantaloons) for men.  As a jacket, a Spencer would normally have long sleeves and some sort of collar, but purely decorative Spencers were often sleeveless with a wide open neckline, intended to add an element of both color and complexity to a garment.  (This is a hint for the following post!).  

     Wikipedia says that such a garment was originally named after the English Earl George Spencer (1758–1834), who is reported to have had his coat jacket adapted after its tails were burned by coals from a fire.  Not only did this garment evolve to be enjoyed by both men and women, but it also was a product of the style seen on current military uniforms, often to the point of sporting tassels, corded trim, and button placement reminiscent of detailing on campaign jackets of the time.  These short jackets of the early 19th century seem to be ancestors of the modern women’s shrug, bolero, and capelet, or the men’s mess jacket, all of which have been in and out of fashionable style at some point over the last 90 years but are still a consistent part of wardrobes of today.

    I know I said I was putting a modern spin on the Spencer.  Nevertheless, I couldn’t help but see how far I could go with mashing up the references back and forth…and so I added one of my favorite Regency reproduction bonnets!  My dad bought this for me years ago from a booth at a re-enactment.  I never have a chance to wear this hat, as I don’t have a historic gown to match it at the moment.  The golden silk, which covers the straw bonnet underneath, is not only too pretty to stay hidden in storage, but matched my dress all too well not to include it for these pictures.  For my jewelry, I chose the traditional Regency necklace for young ladies of a golden cross necklace, a special gift from my parents when I turned 13, and vintage pearl drops from my Grandmother’s collection.  A curated ornamental garden was the perfect setting for a healthy stroll about in wistful reflection, as every Jane Austen heroine was want to do in every novel!

THE FACTS:

FABRIC:  A rayon blend jacquard, with the bodice fully lined in a flesh-toned polyester which had been microfiber bed sheets (also used to line this 1990s sundress, posted here)

PATTERN:  Simplicity #8941, a historical sewing pattern by American Duchess                                                  

NOTIONS NEEDED:  thread and two hooks-and-eyes

TIME TO COMPLETE:  This was made in about 10 hours and finished in May 2021.

THE INSIDES:  The entire main body is fully lined, while the sleeves have bias bound edges.

TOTAL COST:  As everything was a second-hand find, bought for pittance, this jacket only cost me a few dollars!!

     This is not my first attempt at a Spencer, only my first historically patterned one.  Technically, this vintage year 1962 “over blouse” that I sewed for a Christmas party in 2022 (see the post for it here) has the design lines and wearable intent of a Spencer.  It features an open neckline, a raised empire waist, and sleeves, as well as adding both interest and complexity to my plainer dress underneath.  This fact justifies the way I was pointing out (in my previous post) that the 1964 dress worn under this Spencer is clearly part of the Mod movement’s Regency revival.  Making that 1962 “over blouse” helped me know how to properly fit this historical Spencer on my body, and it prepared me for the silhouette.  Historical revivals are helpful like that.  Authentic reproductions can feel daunting to sew for the first time, but their modern imitations may just be the trial run that a sewist needs to feel comfortable with a particular style or method of construction.   

     There was a useful multi-purpose intent behind making this post’s Spencer jacket.  Not only was it to complete my 1960s-does-Regency dress and give me a modern twist on something historical.  It was to be my “wearable muslin”, a preliminary test for the pattern.  This was my first “American Duchess” pattern.  I had no idea what to expect, especially when it came to sizing, especially since it was released through Simplicity Company.  I planned on making the pattern’s dress for a historical event and thus felt that this Spencer jacket, made using a fabric I had plenty extra of, would be a low-risk test run.  Both the dress and the jacket share most of the same pattern pieces, after all.  

     The sizing seemed to run true to Simplicity’s charts, and I found the fit good, but slightly wonky.  The many seams made the fit easy to fix, especially across that trademark Regency diamond grid around the back of the shoulders.  As-is, out of the envelope, the pattern seemed to have very droopy, rounded shoulders that did not stay on my body, and be catered to women more endowed by nature than I am.  Firstly, I brought in most all of the seams by an extra 3/8 to 1/2 inch, since I went up a size (to be on the safe side) and the jacket needed a snug fit.  Then, I tapered some seams across the shoulders and my front chest.  These adjustments gave me slightly more gathers across the sleeve head.  Yet, I do not mind an even puffier sleeve when the 1930s over-sized shoulders work so well on me.  I made notes of my adjustments to the pattern so as to transfer it to the forthcoming Regency dress I would make from this same pattern.

     The waistline (aka, bottom hemline) to this jacket runs extremely high, even for me who is shorter than the average torso.  Beware, most who attempt this design will probably need to add in a few inches the bottom in order to make this pattern extend to a true under bust length.  I found out the hard way.  I didn’t add any more than an extra seam allowance to the pattern’s hem, and ended up sewing in a scant ¼ inch hem just to salvage this Spencer. I do still have a few more yards of all materials, so theoretically, if I want to cut a new front panel that has a lower hemline, I can do so.  The beginnings of the Regency period’s fashions (1790s) had the highest waistlines of the era, and as this pattern is from that same early transitional decade, I should have known such a fit may have been the case.  The 1960s dress under my Spencer has an empire waistline that is akin to later in the Regency era.  These two garments do not exactly correspond flawlessly, but this experiment is still a success to me.  It’s so odd how such 20 years apart in the Regency can be different in their distinguishing characteristics.

     The tight fit I achieved helps the Spencer stay in place on my body, but the front still has the tendency to ride up on me, way above the waistline of my dress.  I think it almost looks like a design feature, and it only disturbs me because I feel that I should have known better.  I love this jacket nonetheless, and enjoy how it completes and alters the overall ‘historic’ appearance of my dress.  This way I can have both sides of my set’s lovely jacquard be seen together, as well!  As weird as such a short jacket is to my modern sensibilities, it was just what I needed for the day of these pictures.  The sunshine was warm yet the air was chilly and my jacket kept me perfectly comfortable, without the heaviness of a full coat.  I could still show off most of my dress.    

     At the time of making this Spencer, I was researching what a historical closure for a Spencer would’ve looked like, but ended up only stitching down a modern hook and eye.  I was feeling non-committal to the permanency of buttonholes.  What if I want the option of adjusting the front closure in the future?  Historical pattern or not, this is a modern rendition so I am not letting myself feel ‘bad’ using new notions.  I have found proof that hook and eyes are a closure method that had been in use for over 300 years before the Regency era already, but I used the modern version of sliding waistband-style hooks that lock to stay securely closed.  I had briefly been considering making this jacket’s front closure double-breasted, with buttonholes and self-fabric buttons that use the orange side of the fabric for a contrast.  Ah, all the ideas in my head are overwhelming sometimes!  Perhaps I will come back to this piece at some point to put my button idea into action.  My wardrobe – and my personal style – is always a work in progress.

     Consider this post the preliminary part of what will be a recurring theme to be shared here on my blog for the extended future.  Over my lifetime of sewing and years of posting on my blog, I have been tracking and studying examples of Historicism and various historical revivals of past styles for fashion.  For the last several years, I have then been creating some examples of such for myself to wear.  Only now have I been ready to share some of this work on my blog, with a recent academic presentation related to this topic successfully in my arsenal of experiences.  I find it odd how Historicism and fashion revivals have recently been making their way into the spotlight.  Fashion of today continues to resuscitate and re-interpret what was worn in our distant past.  We need to be able to consider, and therefore recognize, the sources for such re-workings in order to place the events of history in their correct perspective.  Fashion is an influence upon as well as a product of the culture that surrounds it.  Our current approach to fashion says a lot about us just the same as reading the ‘why’ and ‘how’ behind something as specific as Regency fashions (for one relevant example) can give away information which explains its own times.  

     “We only redefine what’s been done before. Nothing is revolutionary in clothing…” the American designer Eleanor Brenner mused in 1990 to The Morning Call.  Yet, the fourth creative director to the design house of Dior, John Galliano, pointed out in a 2001 interview, “I think reinterpreting things with today’s influences, today’s fabric and technology is what (a historic take on fashion) is all about.”  Hopefully my little Spencer jacket can help add an element of fun to figuring out a bit of fashion history.

Mod “Regency” Fashion

    I find it so fun to be on top of the latest fashion trends through wearing vintage styles of the last hundred years.  An interpretation of “modern” fashion is still some sort of historical take, more often than not, as John Galliano (the fourth creative director for Dior) had said in a year 2001 interview.  With all the craze over every possible pseudo-Regency era design at the moment (due to a popular streaming show), I thought it was high time to bring out a certain “on topic” project that I made years back but have not yet shared.    

     There is one particular revival of the Regency style that I personally have admired for many years but seems to be off of the populace’s radar.  It is too good to keep to myself any longer, so I’ll let the “cat out of the bag”, as the saying goes!  The early to mid-1960s Britain (specifically) had a very organic interpretation of the styles the ladies of that country wore 150 years beforehand.  The Mod trend, stemming from the “Youth-quake” movement, generated forward thinking designers who looked back to the glorified past for a fresh inspiration of fashion styles.  Yet, this take only brought in historical elements.  Evening length skirts, a raised empire waistline, open necklines, and puff sleeves characterize the Mod version of Regency inspired fashions from the 1960s.  These styles are just similar enough to their circa 1810 sources, but still different enough to be an individually unique interpretation.  As the wearing of vintage clothing continues to be a popular practice today, this Mod Regency style is my favored way to merge my love for the styles of the last hundred years with my admiration for older historical fashions…like the Regency era!   

THE FACTS:

FABRIC:  A rayon blend jacquard, with the bodice fully lined in a flesh-toned polyester which had been microfiber bed sheets (also used to line this 1990s sundress, posted here)

PATTERN:  Advance no. 3537, year 1964, a vintage original from my personal pattern stash

NOTIONS NEEDED:  Lots of thread and one long 22” invisible zipper

TIME TO COMPLETE:  This took me about 12 hours and was finished in April 2021

THE INSIDES:  So clean! I bound the raw edges (seen along the skirt) in bias tape, but the entire bodice and sleeve edges are covered by the lining.

TOTAL COST:  Next to nothing!! All materials, even the zipper were picked up at a second-hand market, where your material is bought for $1 a pound.  The jacquard, in so many yards, was heavy and so most of the cost.  I suppose I spent about $5 on this dress.

     Now, the 1960s was re-working the Regency styles after the same time span as the Regency era’s revival of 1660s renaissance styles.  There was a 150 year gap between each.  The recent explosion of fast fashion has led to styles coming back on trend much more quickly than an organic fad, which takes much longer to circulate around.  The decade of the 1990s came after the 1960s in yet another regency revival (especially for prom dresses), no doubt due in small part to the influence of movie and television productions which were cranking out amazing visual interpretations of Austen novels (such Sense and Sensibility, Persuasion, and Pride and Prejudice of 1995, Emma of ’96, and Mansfield Park in 1999).  Now in the 2020’s, the popularity of the Bridgerton series combined with a renewed interest in 90’s styles has led to a very loosely based Regency revival.  I have seen many smart sewists in the last few years taking the empire-waisted, spaghetti strap satin formal fashions of the 1990s and refashioning them into glitzy Bridgerton gowns.  This is just a modern expression of the same practice of “Historicism” that drove the real Regency era of circa 1810 to incorporate Elizabethan neck ruffs and slashed sleeves of the Renaissance fashions that inspired them!

     Due to the most recent 1990s and 2020’s interpretations of Regency styles, the basis behind these pseudo-historical designs confuses the original reference that these styles have.  I have currently seen much misunderstanding over what the Regency era time frame is, and even what the original fashions are and what fabrics they would have used.  True Regency is not Tudor or Renaissance, and barely 18th century.  It is early 19th century, encompassing a time frame of 1795 to 1837.  Thus, I will forthwith post my recent attempt at a real Regency ensemble to help myself and others be able to understand a truly authentic representation and enjoy more details about the era.  A clear understanding of the fashions of the past can, however, clear up any muddling of the facts that re-interpretations may bring about.  Outside of a living history event, though, it is worthwhile (and fun) to bring elements of what is appreciated in historical fashions into wardrobes of today.  We stand on the innovations of the past to build the best ideas of today.

     Now, let’s dive into the story behind my Mod 1960s Regency dress!  The pattern I used is an Advance brand design that clearly mimics the clothes from the designers who headlined the 60’s Regency Revival – Mary Quant (with a pattern for Butterick),George Halley, Anne Fogarty, Norman Norell (with his famous “Josephine” gown), and Bill Blass (for Maurice Rentner).  Advance patterns were sold exclusively for J.C. Penney, and were in business from 1933 to 1966.  However, Advance did have their own in-house designer for the handful of years they lasted into the 1960s.  At age 25 in 1962, Joan Lakow was reportedly was the youngest pattern designer in the country (according to this old blog article found through the “Wayback Machine”).  For Advance Company, Joan “translated currently popular designs for home sewing.  As a pattern designer, she capitalized on the fads.”  That blog article also quotes how Joan very ironically deplored American women following the looks of European women, and gives info about her background, so please do click over.  Nevertheless, my point is that this pattern being a copy of the great British designers’ creations is a very plausible possibility!  Simplicity #5966, a pattern for teens from the next year of 1965, is an imitation of the design I used, which makes me wonder if the other pattern companies paid attention to their competition as closely as it seems.  The original designer pieces behind this Advance design are fabulous, and definitely a great inspiration for any modern Regency inspired project.

     I don’t know why, but so many of the Mod 1960s Regency-style dresses I have found are most frequently in shades of either yellow or red.  Why not just combine both popular shades to wear orange, I thought?  I have a weakness for orange, and my dress’ fabric is an unusually tame and appealing variety.  After all, many of the most fashionable (and malicious) women in Jane Austen’s tales are often depicted wearing orange.  Even though I do not want to embody such women, I do know such a vibrant color was popular in the Regency period.  Many of the era’s fashions used ethnic Indian cottons that already prized a richly dyed orange (as well as yellow) for the societal expressions of their Northern and Western states, such as Punjab or Gujarat.  Orange was a color often popular amidst the bold tones of the 1960s, as well, when Mod fashions were fascinated by cultural clothing at the same time as preferring to use bright solid tones. 

     Only because it was cheap second-hand find, I had picked up an over 6 yard bolt of this lovely yellow and orange modern jacquard with no project to immediately designate for it, as I often do.  As this was a longer cut of fabric than I normally hold onto, I had no room in my stash to put it away, either.  Thus, it precipitated my finding a use or it sooner than later.  The retro circular “print” screamed 1960s to me.  Even still, I found the fabric subtle enough that it could pass for any era.  The weight and softness of the fabric was perfect for such a slim and structured dress that has no gathers.  I feel that I found the perfect merging of 1960s-does-Regency in this thrift-store jacquard, all the while catering to my preferred taste.  My dress is so dreamy and comfortable yet incredibly fun to wear!   

     It was relatively easy to make.  The hardest part was adjusting the fit.  This dress needed a smaller wearing ease (a snug fit) that was very specific to my body’s shape at the time it was finished, and so I estimate I may have to tailor the depth of the seam allowances at some future date.  That process will not enjoyable as the jacquard has a loose weave which does not lend itself to helping me easily find the thread to unpick.  Nevertheless, I am glad there even is wiggle room to re-fit this dress (unlike most store bought, ready-to-wear items).  Having the ability to customize my future fitting needs is one of the reasons why I did not trim down the thick seams to the darts, but merely gave them a good steaming with my iron to press them flat.  The under bust area needed the tightest fit, as doing so helps anchor the empire seam in place on my body, so that no matter if I reach up or twist around, the rest of the dress and the neckline is kept in its proper place. 

     I made things easy for myself with such a snug fit and modernized the closure by installing an invisible zipper down the back.  Easy dressing makes for a happier me when trying to get out of the door!  I also eliminated the fiddly internal facings since I was fully lining the bodice.  Even when I am studiously following a pattern’s design, I always enjoy finding my own subtle ways to both customize and streamline the instructions.  This dress’ unusual shape needed to be fuss-free in order to be properly enjoyed.

     I figured that this vintage Advance pattern ran small (based on others I have used beforehand), and measuring the tissue pieces justified my assumption.  Thus, I sized up, giving myself extra room in the hips.  Slim silhouettes are not easy to fit on my curvy figure, and the hipline width was extra-ordinarily small.  Even still, the sleeves ran large, so much so that I ended up having to gather the sleeve cap…something that ended up both more comfortable to move in and historical-inspired.  The empire waistline at least ended up in the right place!  The length of the dress needed a deep hem to be the ankle-skimming length you see on me, but a thick hem does help lend a nice weight to help it hang. 

     For as modern as this pattern is, I do feel it has a touch of couture impracticality that reminds me of historical fashion.  There is a back kick pleat to help give me a bit extra room to move.  Yet, this dress does keep me walking slow and delicate like a prim and proper lady, much like the famed restricting “hobble skirts” of the Titanic 1910s era.  The wide open neckline is not your everyday design but is dramatic and screams “fashion”!  It frames my face, squares up my shoulders, and is well-tailored enough to not be at all sloppy in its fit across my chest.  This is a very particular design that tells of a very specific trend in the 1960s.  I just love it, even if it is a dress not meant for activity or large strides in walking, much like many clothing for women in the past.  When wearing this garment, I feel pretty, life seems a bit more romanticized, and I am thankful to have the ability to sew.  Aren’t such effects supposed to be part of the benefit of “modern” fashion…to be able to sample and customize what we want to wear for our personal enjoyment or benefit?

     The setting for these blog pictures was up to the challenge of being both extravagant and historical inspired.  This was the “Renaissance Room” of a bed and breakfast we stayed at for a small weekend getaway a few hours out-of-town.  Even though (as I said above), the Regency Era is not Renaissance, this room neither historical epoch  It is merely a very ornate, floral styled room that calls to mind older styles of interior furnishing that relied upon excess as a mark of status.  My jewelry was equally fancy.  The earrings are vintage (probably 1950s or 60s era) costume jewelry from my paternal Grandmother, while my cameo necklace is something from my own childhood.  I added a few small hair flowers to my curly up-do, and carried with me a vintage 1940s rayon scarf (hand painted, by the way) for some extra accessories, something very important to a Regency lady’s fully completed ensemble.

There will be a follow-up “part two” post to further this current theme.  After all, any Regency dress, even if only a vintage reproduction, would not be complete without additional clothing items to create an entire outfit.  Thus, I made a short Regency jacket, termed a “Spencer”, to complement the dress.  I did have plenty of yardage leftover of my material, after all, and a jacquard has two “good” sides of the fabric.  At the same time, I wanted to go and try to flip the coin here and make a truly historical pattern look modern.  Enough said!  You need to wait for that post for all the details.  A great dress is the perfect way for me to start an amazing outfit set, and this post’s piece is everything I never knew I needed to have a “modern” spin on the Regency era!

It’s Mathematics! My 500th Blog Post!!

     When I began my blog 12 years back in 2012, I never have thought that today I would be celebrating my 500th post.  If you do the math, that statistic amounts to at least 41 projects shared each year, and a dizzying amount of words to match!  I can’t believe how much I still enjoy keeping up my blog, and am so pleased how many of you appreciate this site. 

     Putting emotion aside, I didn’t want to overthink which project to share for this momentous occasion.  I considered a party gown, an Agent Carter dress, or even a fancy robe from my queue of not-yet-shared projects to post.  However, I have two separate pieces that are easy-to-wear yet equally fun and unique as anything fancy.  Half of this set is from a vintage style from one of my favorite designers while the other half is completely self-drafted.  Either way, as you will see, both items rely on mathematics as their theme.  As I am looking back at my blog statistics for the last 12 years lately, a math-oriented project that is casual yet classy, quirky yet unpretentious seemed to fit the bill of my 500th post quite nicely, after all.  Perhaps, you can add to my engagement numbers by letting me know in the comment section your own thoughts this post.  I would love to hear from my readers, anyway, to help celebrate with me!

THE FACTS:

FABRIC:  for the Top – a vintage 1970s era cotton and polyester blended knit; for the Skirt – a burgundy colored apparel weight polyester challis from Uptown Fabric shop on Etsy, already used to make this 1943 Agent Carter slacks suit (posted here)

PATTERN:  Butterick #6530 by designer Betsey Johnson from 1972, a vintage original from my personal stash

NOTIONS NEEDED:  lots of thread, one zipper for the skirt’s side closure, and a stray single shoelace became the cord for the top’s neckline casing

TIME TO COMPLETE:  The top took me 4 hours to make, while I spent 6 hours on coming up with the skirt.  Both were finished in October 2023.

I added a satin ribbon in the shoulder seam to prevent stretching.

THE INSIDES:  The top has its inside edges left raw as the knit does not ravel.  The skirt has no raw edges showing the way I sewed it together, and the sealed selvedge edge is the only thing showing at the waistline…so very clean!

TOTAL COST:  The top’s fabric was bought second-hand for pittance, while the notions were on hand already, so I’m counting the skirt’s material to be my only cost.  This outfit cost me $15.  

Some of the preliminary mathematical figuring I made for drafting my skirt…

     Mathematics is all about precision and accuracy, the same qualities of the finest clothing.  I aim for high standards in my sewing, and that feels very much like a math-oriented quality to me.  In an era where we have our latest technology assists so much of our lives, eliminating the need for mental figuring, I am of the type that still uses the old fashioned methods of mathematics to do my garment drafting.  It hasn’t failed me!  For as fluctuating and changeable as my body is any given day, I never fail to be amazed at the way that something as harsh as raw numbers or flat lines on paper can transform fabric into something which fits the body.  Thus, I feel like this skirt really is my math set.  It tested my math skills, my level of accuracy in drafting, and my calculating foresight to sew my skirt.  My blouse not only used a math-themed print, but also has mitered corners, sweeping curves, and angular lines for a perfect array of geometric shapes.  I love wearing this set and hope my joy can be seen through this posts photos!

     I have been mentioning the designer Betsey Johnson in my posts on a consistent basis, especially ever since I shared my first project using one of her sewing patterns for the Fall of 2022.  (Go to that post to learn more about her life!)  That post’s dress pattern was from 1971, and was my sneaky set-up to my eventual sharing of this post since my current project hails to 1972!  Thus, I approached the making of this top with an unusual confidence for using a vintage pattern.  In my most recent post, I mentioned how the sizing trend for her brand is predictably short-waisted, but they also run small in the bust, which is just my proportions.  I have several original Betsey Johnson ready-to-wear items (not Alley Cat Brand) that I posted about here to establish the fact that her clothes seem as if made for me.  It’s always so nice to find a line of clothing that seems to be tailored for your personal fitting needs, but such a discovery is even sweeter when there are sewing patterns to match, too!

A dress version of my top! Butterick no.6530 by Betsey Johnson of Alley Cat, as featured in Butterick Home Catalog, Spring 1972.

     The Butterick Betsey Johnson patterns of the 1970s tell a great story about the woman behind the designs.  Her youth-focused designs dictate some of her sizing preferences, as the sizing chart on her patterns show that the offered measurements are either Junior Petite or on the small end of adult proportions.  However, her models – both live and illustrated – always look so tall and leggy to appeal to the 1970s trends as well as the era’s gawky teenager looking for the coolest Bohemian chic clothing.  I am not tall and leggy, but I feel that the long lines of this top help make me look so!  I made sure to lay the lines of the measuring tapes that are in the background of my print as running vertical on my body to further lengthen this top visually.  The straight lines of my pleated skirt also carry the linear theme. 

     Betsey’s penchant for using knit fabrics calls back to her desire to offer pieces both as easy to wear, as they are easy to fit, and take care of on a day-today basis.  Knit fabrics were the material with which she first found success selling her velvet trimmed sweater tops back in 1964.  My previous Betsey Johnson dress could have used either stretchy or woven non-stretch materials, but this pattern is solely a design for knit fabrics, like most of her Butterick patterns.  Nevertheless, knit fabrics in the 1970s were often very stable and different from the super stretchy spandex knits of today.  Therefore, the separates that are part of this pattern all have zipper closures and stable waistlines or necklines.  For my version of this top, I did leave out the back zipper.  My tightly woven fabric stretches just enough to do without the zip even though the knit is a very tight, non-elastic content knit.

     Betsey’s preference for bold floral and oversized plaid prints during her Alley Cat line was the beginning of her spiral into crazy novelty prints for the namesake brand that followed.  As I was using an Alley Cat pattern, the way I made my top only anticipates the style of prints she used in the 1980s.  I have reasons to believe my novelty print is from the 1970s, so I think my unique merging of influences just works out!  I call this a “conversion chart” print for the way it shows various imperial and metric units of both length and volume.   The acronyms for these units are in basic colors and float aimlessly over a background of yardsticks lined up in a row.  I appreciate the way the print has all the different numerical amounts I use on a daily basis between cooking, sewing, and price adjusting when shopping.  I never would have thought that I would end up with a piece of clothing that can substitute for a conversion chart or measuring tape, if needed, but I love the quirkiness of it!  It’s so “me” while also being unequivocally Betsey Johnson.    

     She was playing with some Renaissance design elements at this time in her career (the 1970s), as evidenced by my top’s puffed sleeves and mitered wrists.  Such references blossomed into full-blown Historicism for her Fall-Winter 1997 and 1999 collections which are a cross between a moody Gothic revival and a Ren-Fair parade of polyester velour.  Betsey’s use of 16th and 17th century design elements started out sweet under her Alley Cat line (as my top proves), but became full-blown Punk with a strong undertone of rebellion in the 1990s.  My top has the quaint look of being an Alley Cat, but I tried to work my hair into a creative Punk look and added socks with my platform sandals for a merging between the 1970s and 90’s. 

A 1973 pleated skirt pattern on the left next to a 1943 pleated skirt pattern

     The skirt was not originally meant to pair with my Betsey Johnson top, but I loved the look of the two together enough to include it for this post.  I merely wanted a skirt to match with the 1940s Agent Carter blouse I had made from the rest of this fabric, and having it pleated was my only requirement.  Yet, before constructing this skirt, I realized that this burgundy pleated skirt would pair perfectly with a medieval inspired project I have been working on…back to the 16th century influence we go!  Pleated skirts were in style for ladies for the couple centuries following circa 1580, and even though my skirt is getting a feature here in this post, it will be an important part of that medieval inspired project (to be posted soon).  However, pleated skirts were incredibly popular in the 1940s as well as for the 1970s, when the latter decade had their own spin on the fashions of the former.  A pleated skirt would have been just below the knee for 1943 (the year of my matching Agent Carter blouse).  Nevertheless, a longer midi length seemed to look better on me with this 1970s top and (most importantly) looked better with my medieval inspired piece.  There is something crucial to sewing for your taste and ideals, not just for ‘historical’ accuracy or to mirror an overly specific motivation.   

     Sticking with a longer midi length worked in my favor for drafting.  I planned to use the full cut of two yards in a way that would keep it one piece.  I did not want to cut the fabric at all just in case I needed this fabric (for some wild, unknown reason) at a future date.  A bought pattern was not going to check off all the boxes I wanted filled for this skirt at this point, so I drafted my own.  A pleated skirt made this project very mathematical.  I had two yards to wrap around my body.  By taking into account one center back ½” seam allowance as well as the finished garment measurements I needed (based off of my true body size plus wearing ease), I could learn of the difference in material I had left.  Then I could figure in a proper amount of pleats to bring the two yards down to my body size.  I knew an odd number of pleats was my goal.  I also wanted deep set knife pleats which would travel around my body in one direction.  This layout helps my skirt have a soft and swishy movement when I walk as if it was a knit, a feature that I love about this piece.  The soft-finish poly crepe does not set a permanent pleat very well, anyways, and it is easier to work with a fabric’s inherent quality than to work against it.   

     Since my fabric was thin and relatively flimsy, I decided I would use it double layered to keep the skirt opaque and substantial.  Does so gave me the opportunity to plan out the hem along the fold opposite the selvedge, as I did for this self-drafted rib knit dress, posted here.  This move also helped me eliminate the need for visible thread along anything other than the waistline, as I remembered the material does not take very well to machine top-stitching.  Since my fabric is 60” width, working with half of the fabric gave me 30” for the overall length.  I shortened this length by folding about 4 inches into the inside to create a stable interior waistline that is smooth and invisible on the outside.  I hand stitched the zipper in the center back for yet another deluxe touch. 

     As I said to start off with, this set might not be the fanciest outfit to show for such a special blog anniversary, but it is really no different from sharing a party dress or something elegant, as I had considered.  Running my blog for so long has taught me many lessons that have carried over to how I have approached my sewing and my general style over the last few years.  Every occasion in life is special no matter what I wear, every garment I sew has the same amount self-investment, and every post or paper I write is something I am incredibly proud of.  I’m trying to be gentle on myself and focus on enjoying the overall process.  My style is continually evolving and growing along with me, and I am thankful that I have the ability to find personal avenues of self-expression, especially through my sewing capabilities.  At first, my blog started off as a sewing diary to add fulfillment in my free time.  Everyone was doing it in 2012, after all!  Yet, after this long, my sewing blog seems to be a long-term passion project which has happily and recently led me into new, unexplored avenues of personal advancement.  There have been exciting clues of some of it already on my blog.  Those who have followed my blog for years or those who merely pop on over to visit over the years get to see the best of me here on this little niche of the internet.  See what a ride it has been reaching 500 blog posts?!?