I do love pockets (…and probably say that way too much on the blog), so really smart pockets that I see on vintage patterns are even more appealing. You know, just because pockets are utilitarian, they don’t have to ‘look’ that way or be hidden. Why should pockets just be tucked in the side seams or merely top-stitched on…why not make them not only obvious but also part of the styling?! I’m glad I sew, because following this train of thought, I found a comfortable and practical early mid-1930s blouse whose stunning design is highlighted by using stripes. And… just because I could without much extra effort, I whipped up a matching velvet beret from a pattern of the same year. What proper 30’s lady would be out and about without a hat of some sort, after all? Amidst a plethora of bias cut gowns and fancy wear, a chic everyday 30’s set is so refreshing and welcome.
 This outfit has been so darn long in coming to completion! For many years now, I have wanted my own vintage beret, and after much searching, I finally found an easy-to-make, reasonable to afford, yet true vintage option to sew. Furthermore, speaking of past project connections, back in 2014 I sewed a skirt, the bottom half from the same pattern as this post’s blouse, using fabric from my Grandmother (post on my skirt here). That same year was when I actually found the shirting fabric to make the coordinating blouse in this post. Sheepishly, I’ll admit I only just recently got around to finally sewing some of what has been long planned out to now have all three pieces – hat, blouse, and skirt – together.
 I have made other blouses of the same era to go with my basic black 30’s skirt (see some here and here), showing how the bottom half of the garment pattern is truly a wardrobe staple for me. However, now that this properly coordinating striped blouse (which certainly gets top billing among any previous 30’s tops) has been made, my outfit feels complete and every bit as stylishly awesome as the pattern intended. This is probably my very favorite make, as well as the most useful and frequently worn, from the decade of the 1930s. Beret hats are not necessarily just for one decade either, and in a lovely grey velvet, this too will be an understated yet elegant and warmly basic accessory in putting together outfits.

 THE FACTS:
FABRIC: Blouse – a striped, textured cotton shirting, with basic cotton broadcloth in a solid black for both the collar and full body lining; Hat – a lofty polyester velvet, in a grey two-tone with a tiny, slight windowpane print on it
PATTERN: Pictorial Review #7379, year 1934 (as I said above the skirt has its own write up here), with a 1934 reprinted pattern from the Etsy shop “kalliedesigns” for the beret hat. The original pattern for the hat is (I believe) Simplicity #1532, view 4.
NOTIONS: I really had everything I needed already on hand – some thread, a little interfacing, bias tape, a metal jewelry chain remnant, and buttons.
TIME TO COMPLETE: I finished the blouse on December 18, 2016. Making it only took me about 15 hours. The hat was whipped up in a few hours about a month after the blouse.
First, I have to address my giving a definite year to this design. I have yet to see a Pictorial Review pattern with a date on the pattern itself, yet I am quite confident in narrowing this one down to late 1934. Styles of the 1930’s were very specific to certain years when you look at certain details such as hem length for both tops and skirts/dresses, shoulder styles, sleeve and pocket trends, as well as hairstyles, accessories, body images, and the like. Taking all of these details into account, I initially estimated this pattern could even be very late 1933 at the earliest, but no later than early 1936. Finding a few Pictorial Review magazines and dated patterns helped me narrow down my estimate, especially this Pictorial Review “Goddess Gown” #7363 adapted from a Lanvin design for Winter of 1934. It is a number very close to my pattern (#7379). Besides, it would make practical sense for my pattern to be from Fall and Winter anyway based on the long sleeve option.
 Beyond the sensible reason, Pictorial review patterns were known to be fashion forward, working with foreign, well-distinguished designers, couture houses, and nobility to release some truly top-of the line and rare styles which would not be available to many ladies of the 1930’s otherwise. Thus, when I found a copy of the same style as my blouse out of a Butterick company Summer 1935 catalog, as well as similar designs in Simplicity #1812 and #1724 (both ca. 1935), I realized what I already assumed about Pictorial Review patterns – that they were the leader of fashion for their time or at least ahead of the trends. Their patterns are printed after all…another factor adding to their prestige!
This blouse was not that hard at all to make – what was hard was matching the stripes (mostly) together with re-drafting the pattern. The stripes are not mirror matching and were playing tricks on my eyes when I was figuring out the placement of the pattern pieces. Also, I had to add in four whole inches because this pattern both runs super small (something I learned from making the skirt already) and I wanted modern 5/8 inch seam allowance (verses the 3/8 called provided for). I spread the four inches out properly and evenly across the entire blouse, like a good girl, for as much as I wanted to take the easy route, I didn’t just add it in on the sides. Nor did I cut apart or otherwise draft a new pattern piece. Yes, I know I made this extra hard for myself. I do that sometimes.
 My blouse might look somewhat straightforward at first glance of the pattern but it has lovely details. The link closure neckline is my top favorite feature, so I’ll start at the neck. Two buttons and a chain to link them connects the dual buttonholes and closes the shirt neckline. I opted for a more decorative and showy jewelry style chain in sterling silver rather than the very basic thread looping together as recommended in the pattern. I do love how the neckline link closure almost doubles as a necklace with the chain! Button link closures are something primarily seen in the 30’s for main fastenings down bodice fronts, jackets, sleeves, and necklines. Depression era practicality, a desire for accessorizing, as well as accommodating the rough means available of washing garments all contributed to the popularity of removable buttons. Many buttons were “change” or “clip on” buttons (read more about them here on Vintage Gal blog); others were link-style, connected by metal or thread. As we just had National Button Day (which was started in the 30’s, by the way), this can be an idea to let those precious and amazing buttons you’ve been saving shine on a garment without feeling like you have to sacrifice them to the wear and tear the rest of the garment will receive. Whatever the reason, I do love the singular and useful practice of link button closures. My fellow blogger, Emileigh, has also made several 1930’s garments with link closures (see her dress here, and jacket here), just like me!
As lovely and soft as the striped shirting is on its own, I decided to fully line only the main body of the blouse. Otherwise, it was thin enough to show seam allowances, underwear, and even the pockets…how racy to think of! There are more reasons than that, though. The black broadcloth renders my blouse a better warmth weight for chilly days as well as perfectly opaque. I was also able to eliminate the facings with this trick…the lining finished off the front neckline opening easily and cleanly. The collar is then the same fabric as the lining. This was not only convenient but also great for matching especially when the collar is open! The sleeves are unlined to keep my blouse from being too heavyweight. Besides, at least with the sleeves I can feel the lovely soft shirting on its own!
 The sleeves are also ‘hiding’ a secret detail – what I believe are darted French cuffs. The outer side sleeve pattern was laid out with what looked like on paper to be a long and wide dart. Except for the last 2 inches being open at the end of the sleeves where the wrist is, the French cuffs smoothly assimilate into the sleeves as a dart which ends to nothing at the elbow. I have never seen anything remotely like this sleeve! The darted part of the French cuffs makes for such a lovely, shapely, tapered sleeve shape that ends in a bang! The cuffs were directed by the pattern to be closed with more link buttons, but I generally use cufflinks instead. Cufflinks would probably not be something a 1930’s woman would have worn in the era were times were hard and pennies pinched, especially not the wrap-around mesh cufflinks that I used (this kind date to the 1960s and 1970s – mine are coveted Anson brand). However, people also liked escapism in the 1930s to forget their hard times, so just maybe I can envision a 1930’s woman doing what I was doing her with my accessories – go big or go home! If Marlene Dietrich wore cufflinks, so will I!
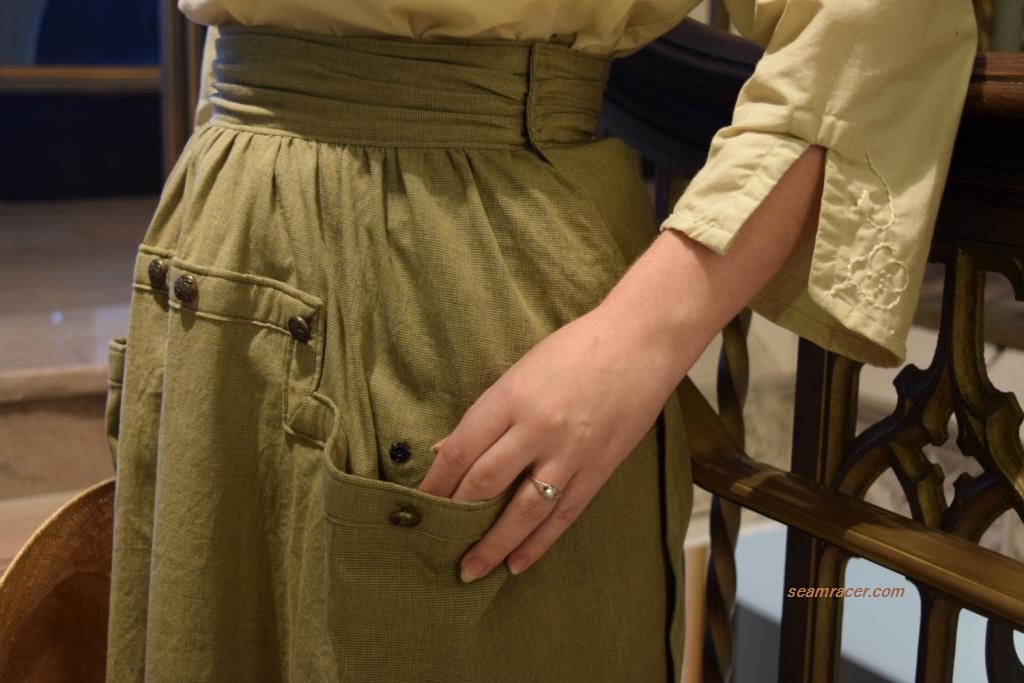
 I’m terribly distracted, though. The above-the-hem hip pockets were meant to be the main attraction! The side panels to the bodice fronts actually extend down to the hem and the top edges of the bottom “legs” of the middle section are hemmed and left open. When the hem is tuned under and the side seams sewn, the pockets are then closed. I love how the pockets are right there is front of me – so handy yet so subtle and hidden into being part of the design! The stripes in my blouse also hide the fact these pockets can hold so darn much! Hipline line front pockets must have been “a thing” in the mid 1930’s, as I have seen numerous versions of them on jackets, dresses, and blouses in patterns offerings at that time from all companies. See this Butterick design from Summer of 1935, Simplicity #1812 from 1935, or McCall #9242 of 1937 for just a few of the examples I have come across.
I will admit to having a love-hate relationship with the action-back, though. Sewn up as-is, the center back box pleat is open from below the shoulder panel (as you see in the the right picture). I wore it like this one or two times, but it just made it feel oversized and fussy. I felt like I needed to wear a belt just to keep it in place. This is silly, I thought! So I hand tacked the box pleat together from the hemline up to a few inches above the waistline. I wanted to make sure to have full movement across my shoulders so I left some of it open. Now it had the right 1930’s “skinny hip” appearance and unfussiness!
Last but not least is the head topper – my hat! I’m sorry but I was so happy with this beret that in my rush to just wear it and enjoy it, I have totally forgotten to properly iron flat the many darts. I suppose this is a good sign! I’m rarely this excited to omit the finishing touch, an ironing job! An ironing session almost felt like too much work for it when this hat came together so quickly.
 The pattern itself could be much nicer – it is rather crudely traced. However, it gets the job done and gives a nice basic piece to use on its own or build off of. After all it is only two pieces, and a bunch of darts to sew, then voila – a finished hat! Most importantly it did turn out well and ran true to size. It is listed as a 22” to 23”, and my head is a consistent 22 ½” hat size. This could not be any more perfect for me, but those who need it bigger, slash and spread more (while keeping the same size darts) and those who need it smaller, I would recommend the easy route of just adding a tiny casing around the head for skinny elastic. I personally left off the recommended head band for the edge, and merely turned under the edge like a traditional hem. This way the hat stays closer to my head and slouches better than with an added band to keep it around my head. The slouch part is designed into the pattern, not just an effect of too much extra room. The pattern is cleverly asymmetric, so if you would want the slouch to be on one side versus another, that needs to be figured out before cutting. I didn’t care…I just dove right in as it didn’t take much of my time, nor did it take much fabric either to have a new hat. If it turned out badly, it was no biggie, but oh did it turn out well!
My background location is earlier than my outfit’s date, but it is an early Art Deco wonder so we just had to include it in a 1930’s photo shoot sometime! The grand “Moolah Temple” was originally built for a Masonic organization, but it is now a posh movie theatre and bowling lanes at the floor level and below, with apartment spaces above. The meticulous and respectful renovations have happily left the building pretty intact and one can see it in its original teens-era splendor. It has dizzying details, with a strong Moorish and orientalist influence which is both unique and lovely. Extravagant ornate terra cotta outside, opulent marble work inside, with original fixtures makes me feel like I stepped back in time, especially when I can wear my vintage appropriate outfits such as this Pictorial Review one!